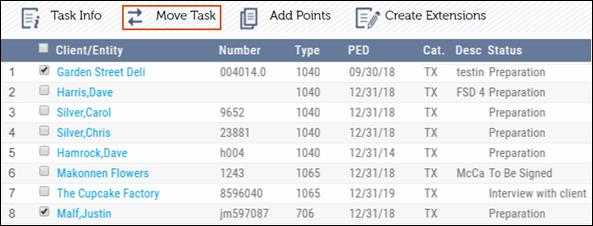
When a new Task is created it always defaults to the status of No Info In. You can move the Task immediately after it is created or use the search feature to find the Task and move it into the workflow process after you receive information from the client.
The Move Task feature helps you to move Tasks through the workflow process of your firm. You can move a single Task or multiple Tasks together after you complete the necessary SignOffs associated with the Task being moved.
Move Task Button

SignOff Notification Prompts
The SignOff feature within XCM allows your firm to maintain a record of who completed a Task and when. If your firm uses the SignOff Notification, XCM prompts a user to SignOff before moving the Task.
When a Task is moved, if a notification prompt is associated with the Task being moved, the assigned notification prompt will appear.
•If the SignOff notification prompt is a Warning, then the following message appears.

Click Proceed to ignore the SignOff. The Task will move without the signoff being completed. Click Cancel to return to the Move Task page.
•If the SignOff notification prompt is Required, the following message appears.

You must complete the required signoffs using the Bulk SignOff tab before the Task can be moved.
To Move a Task:
1. Select the Task and click Move Task to open the Move Task page. You can also clear the open Points, open Checklists, and complete the SignOffs before you move the Task.
Move Task

|
|
The Client/Entity Number and Description are now displayed in the grid. |
2. In the Move Task page, select the Task you want to move.
3. Select or confirm the next Status in the To Status drop-down list. This will be the Status to which the Task is moved.
4. Select or confirm the user in the To Whom drop-down list. This will be the person assigned to the Task in the next Status. When the Responsible person is inactive, a red comment notification appears in the corner of the To Whom drop-down list. To display the complete notification message, move your cursor over the red comment notification.
|
|
Some Statuses do not require the “To Whom” column to be populated. Typically, those Statuses would be for admin functions like “To Be Assembled” and “To Be Shipped”. Leave the “To Whom” field blank to move the Task to the admin. Before you move a Task to Outsource (domestic) Status, make sure that you have uploaded the Task related documents. |

5. In the Add Time text box, enter the actual time spent working on the Task. This time is added to the appropriate person and also logged in the Control Sheet.
6. Select the RSR (Routing Sheet Role) check box to assign the user to Primary Role, if required. You can enable the Routing Sheet Role only if the workflow is mapped for the specific Task.
7. If there are any applicable signoffs associated with the Task being moved, you will see a hyperlink marked W-1 or R-1 under the SignOffs column. Click the hyperlink to open the SignOffs page where you can complete the SignOff process.
8. When you click Save & Move, you will see the following message since the Task being moved is associated with a Required notification prompt as shown in the SignOffs column.

9. Do one of the following depending on the notification prompt displayed under the SignOffs column:
•If the prompt is marked R-1, then click the hyperlink to open the SignOffs page and complete the signoffs as explained in the following section. You can also signoff the Task using the Bulk SignOff tab.
•If the Prompt is marked W-1, you can choose to move the Task without completing the SignOffs section.
If the Prompt is marked --, it indicates that the Task is not associated with W or R warnings.
SignOffs
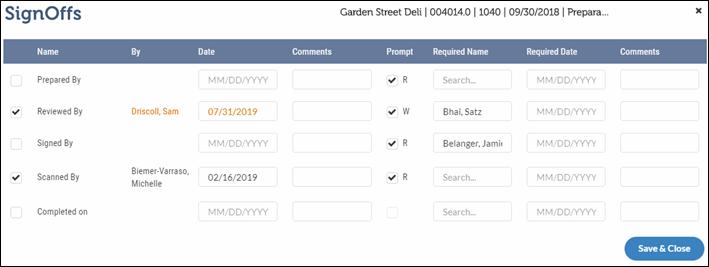
a. On the SignOffs page, select the check box beside the Name column for the Task step you have completed.
b. Click Save and Close to save your name and today’s date to the selected signoffs in the Routing sheet.
10. From the Move Task tab, click Save & Move Task to update the Staff section of the Control Sheet with the most current information (Role, Staff name and Actual Time spent on the Task). A message appears indicating that the Task is moved successfully.
|
|
If your firm maps your internal workflow process within XCM, XCM will automatically suggest the next logical step in your process and the next logical user to whom to assign the Task. A user has the option to sign off on completed steps. Firms have the option to assign warning prompts to each SignOff step or to make the SignOff requirement compulsory. You can then continue to move the Task through your firm’s workflow process by selecting the Move button and moving the Task through Questions, Review, Assembly, Signature, Shipping etc. as determined by your firm. |
Open Points
The Open Points tab displays all Open Points associated with the Task. The numbers beside each Point indicate the number of closed Points vis-a-vis the total Points. Click All Points to view all Issues available under Knowledge/Instructions, Questions, and Review Points.
You can close an open Point before you move the Task.
Move Task-Open Points

To close an Open Point:
1. Select the row and click the Response column to open the Edit Response page.
Edit Response
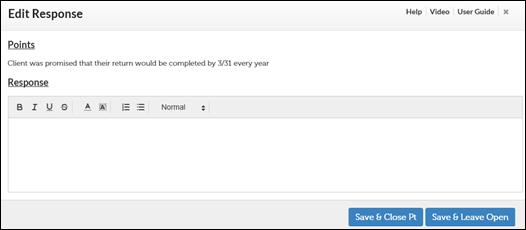
2. Enter the response.
3. You can now:
•Click Save & Close Pt to save the response and change the Status to Closed.
•Click Save & Leave Open to save the response and leave the Status as Open.
4. The saved response is displayed in the Response column.
Open Checklists
The Open Checklists tab contains Checklist details associated with the Task being moved. The Checklist page is accessible from the Control Sheet.
Move Task-Open Checklists
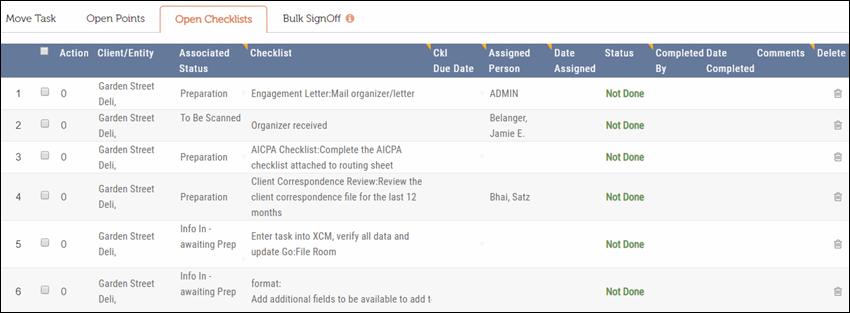
Select the row and double-click the Status column and then click Done to clear an open Checklist.
You can create a standard list of checklist items for a Task so that when a user creates a new Task, the standard list of Checklist items will automatically populate on the Checklist page along with the related information.
A user with Manage SignOff and Checklist item user rights can add or change an existing checklist item. This will allow the user to customize the Checklist page for a Client/Entity. Whatever changes are made to a particular Checklist item will carry over to the following year if the user wants to carry forward Checklist items at the Task level rather than rolling over a Task from the utility.
All users can change the Associated Status, Assigned Person and the Completion Due Date fields manually from the Checklist page.
Actions on Open Checklists
You can perform the following tasks on the checklists.
1. Bulk Edit the tasks
2. Compose E-mail
3. Assign checklist to the designated user
4. Unassign checklist from the designated user
Bulk Edit
You can do the following using the Bulk Edit action button.
•Associate a Status to the checklist
•Specify a Completion Date for the checklist
•Assign the checklist to a user
To bulk edit:
1. Select the tasks that you want to move in the My View page.
My View – Move Task
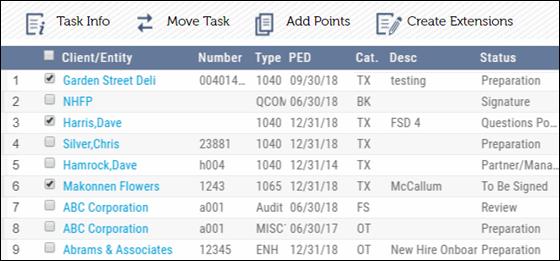
2. Click Move Task.
3. Click the Open Checklist tab to view all checklists associated with the tasks.
4. Select the checklist(s) you want to edit.
5. Click Bulk Edit.
6. In the Bulk Edit pop-up, provide the required details.
Checklists – Bulk Edit
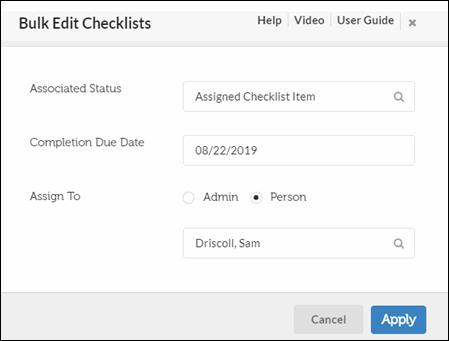
7. Click Apply.
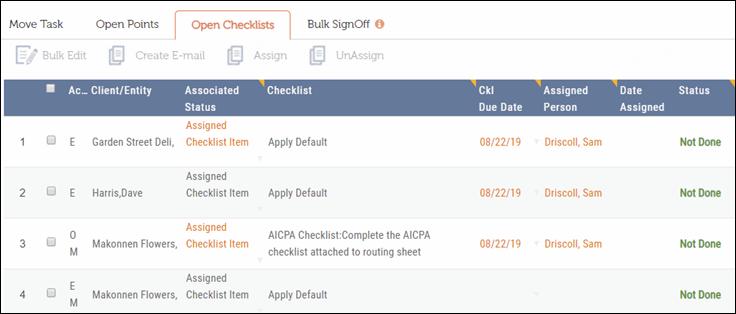
The Associated Status, Completion Due Date and Assigned To user are displayed in the bulk move grid.
Bulk Move Grid
Create an E-mail
With this option, you can select a single checklist or multiple checklists pertaining to a single client and create an email with the checklist details.
Assign a Checklist
You can assign a checklist to the Assigned Person when you select the checklist and click the Assign action button.
Assign Checklist

The assigned user gets an E-mail notification.
Un-assign a Checklist
You can un-assign a checklist when you select the checklist and click the Unassign action button.
Unassign Checklist
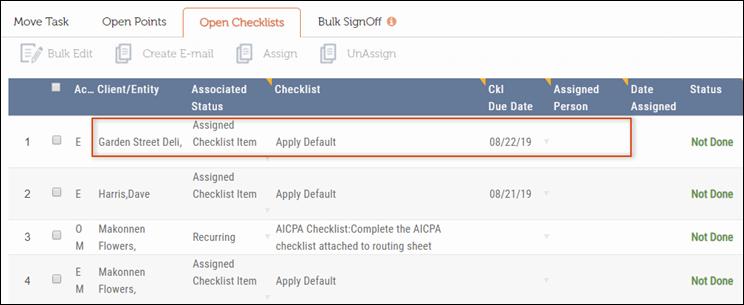
The user receives an email notification that the checklist is no longer assigned to them.
For more details see Checklist under Control Sheet.
The Bulk SignOff tab displays all of the Warning and Required signoffs that are linked to the From Status of the Task being moved. This feature allows you to signoff a single Task or multiple Tasks simultaneously.
Move Task-Bulk SignOff page
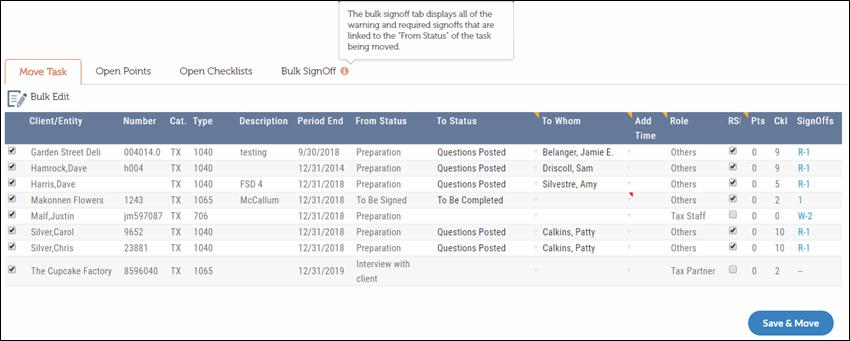
Select the Tasks and click Save to save your name and today’s date in the Control Sheet. After you complete the required signoff, go to the Move Task tab and click Save & Move Task to move the Tasks.
|
|
Only Tasks with Required (R) and Warning (W) notification prompt appear under the Bulk SignOff tab. |
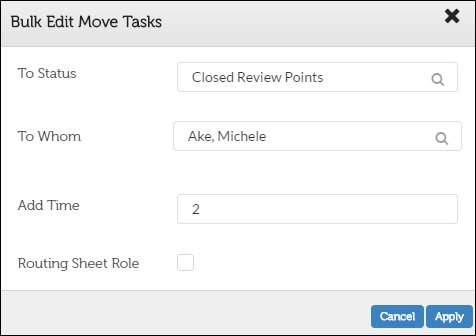
The Bulk Edit operation allows multiple Tasks to be moved simultaneously. Tasks of same category with different Statuses can be moved in bulk. You can select multiple Tasks and move them to a single Status and user when required.
Bulk Edit Move Tasks
A user can easily document Points related to the Tasks in a central location. This ensures that:
•Information is accessible by all members of the team.
•Open items or Knowledge Points are addressed during the workflow process.
•Review Points for Open items are captured and addressed.
Add Points Action Button
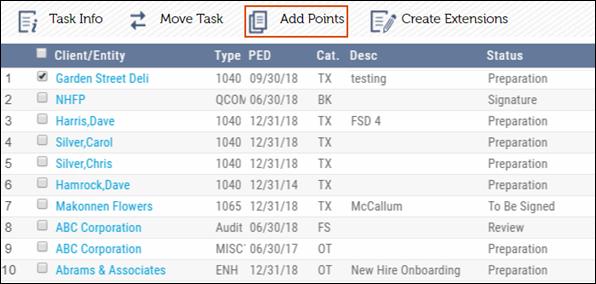
Select the Task and click Add Points to open the Add Points page.
Add Points
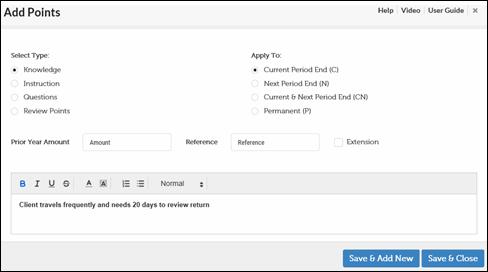
For more details on Point types, to add a Point for a Task and to email Points to a client/entity, see Points.
The Task information encompasses details about Deliverables, Assembly, Shipping, eFile, SignOff, Engagement, and Extensions pertaining to a specific Task. The Task Info drop-down menu enables you to navigate to the specific Task information page directly from the My View page.
To display the Task information:
1. Select the check box on the same row as the client/entity for whom you want to view Task information.
2. Move the mouse over the Task Info action button to display the items.
Task Info Access
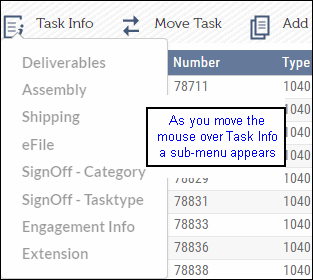
3. Click on any item link to open the Task Information page.
Task Information

The table that follows describes the various Task Information links:
Task Information Table
|
Labels/Links |
Descriptions |
|
Deliverables |
This section of the Task Information displays details of the Deliverables for which the client or entity has. You can add, delete or mark these Deliverables as Not Filing. For more information, see Deliverables. |
|
Assembly |
The Assembly section of the Task Information provides details on Deliverables associated with the selected Task, assembly instructions, Filing methods and attachments if any. For more information, see Assembly. |
|
Shipping |
This section of the Task Information provides you with shipping details and helps you identify information such as Who Delivered, Mode of Shipping, Tracking number, and Status. For more information, see Shipping. |
|
eFile |
This section of the Task Information provides you with a list of Deliverables, corresponding form types, and the Filing methods. For more information, see eFile. |
|
SignOff |
The Sign-off section of the Task Information helps to track and control the Sign-off process related to a Task. For more information, see SignOff. |
|
Engagement |
The Engagement section captures information such as the type of engagement (PCAOB or Non-Public), Entity Structure, Financial Statement Date, Industry, Foreign Operations, Engagement Partner, Basis of accounting, Comments, Concurring Partners and different conclusion dates. For more information, see Engagement. |
|
Extension |
This section of the Task Information helps you raise a Due Date extension request for one or more Deliverables related to a Client or an Entity. For more information, see Extensions. |