The Assembly section of the Control Sheet lists the Deliverables associated with a Task, Form types, Filing Methods, assembly instructions and the number of attachments that correspond to each Deliverable.
From this section, you can enter details such as the Signing Authority, Type of Copies, Delivery Method, and Deliverable Status.
Features to note in the Assembly section are:
•Other methods of moving deliverables with the Filing Type None to Complete
From the Assembly section you can also:
The Assembly, Shipping, eFile and Extension sections are provided with secondary line headers to indicate what columns the staff and support staff can update in the relevant grids. Staff editable columns are marked in green and support staff editable columns are marked in orange.
When changes to the grid entries are made, the text color turns orange in the cells. After the changes are saved the text color changes to black.

This feature enables you to change information that is common to all the rows selected.
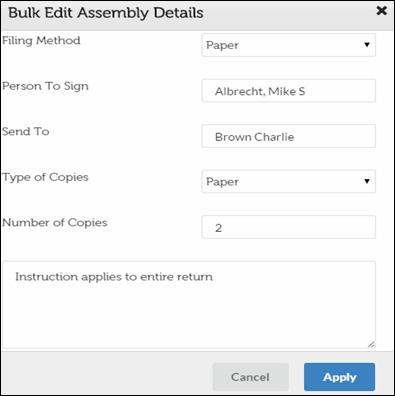
To modify details in one or more rows, select the rows and click the Bulk Edit action button. This opens the Bulk Edit Assembly Details dialog.
Bulk Edit Assembly Details

1. In the Bulk Edit Assembly Details dialog, select items from the drop-down lists or enter details to be made common to all the Tasks selected. You can also enter comments in the text box provided.
2. After you have entered all the details, click Apply to store the edits across all the selected tasks.
XCM enables you to edit some of the columns in the Assembly section such as the Filing Method, Person To Sign, Send To, Type of Copies, and Number of Copies using the inline edit feature. See Assembly page.
To edit a line item, move your cursor to the relevant field and type the new information.
|
|
A column that can be edited is distinguished by a red triangle in the corner of the column heading. All three in-line editing methods (point and click, drag and drop, copy and paste) work for all the cells below the columns marked for in-line editing. |
When you ship an assembled Task, the Filing Method is extremely important. You need to inform the assembler responsible for signing the Task about how it should be filed (Paper or eFile) and also include any attachments to the assembled Task.
You need to select:
•Paper if you are filing the tax in paper format, or if the Task being worked on is a non-tax Task project.
•eFile if you are filing the tax Task in electronic format. The Task will move through the eFile process described in the following sections.
•None if the Task is an internal or operations Task and nothing is being filed. The Task will be completed with no filing recorded.
Move File Type None to Complete
When a task deliverable has the Filing Type None in the Assembly section of the Control Sheet, it is possible to move the task to the Completed status directly from the Shipping section, also using Move Task, and thereby avoid the need to manually fill the columns in the Shipping section to be able to move the task to Completed. When this is done, the columns in the Shipping section of the Control Sheet are automatically filled to capture the history.
Tasks that can be moved to Complete
Existing conditions for being able to move a task to Complete will be applied before a task is moved to Completed. These conditions are given in the table that follows, and both conditions need to be met.
|
Conditions |
A task can be moved to Complete |
|
Condition 1 |
When other deliverables on the task, that are marked as eFile or Paper, are complete. |
|
Condition 2 |
When all required Signoffs are completed. |
Warning messages are displayed when a task is moved to Complete and the following are present:
•Task has open points
•Task has incomplete checklist items
•Task has incomplete signoffs
Move Task to Completed Procedure
1. In the Assembly section of the Control Sheet, select the Filing Type None for the deliverable(s) that you want to move to complete.
Select Filing Type None for Deliverable to move to Complete

2. In the Shipping section of the Control Sheet, Click Move to Completed.
Shipping Section–Move to Complete

3. After you click Move to Completed, the columns in the Shipping section are automatically filled in as shown in the figure that follows.
Columns in Shipping Section are automatically filled

Other methods of moving deliverables with the Filing Type None to Complete
There are two other methods to move a task deliverable with the Filing Type None to the Complete status. They are:
•Bulk Move from My View and Advanced Search
•Click Move Task on the Control Sheet header
Bulk Move from My View and Advanced Search
1. In the My View page or from Advanced Search results, select the clients for which you want to move deliverables with Filing Type None to Complete.
Select Clients with File Type None to move to Complete

2. From the Task Info drop-down, click Assembly to open the Assembly section of the Control Sheet.
Assembly Section–View Clients with File Type None

3. In the Assembly section, deliverables with the Filing Type None are displayed.
Move to Completed in Shipping Section

4. In the Shipping section, click Move to Completed.
Columns of Tasks moved to complete automatically filled in Shipping Section

All the deliverables in the Shipping section now have the status Complete.
Move button in Routing Sheet Header
To move a task deliverable with Filing Type None to the Complete status,
1. In the Assembly section of the Control Sheet, select the Filing Type None for the deliverable(s) that you want to move to complete.
2. Click Move Task on the Control Sheet header. This will result in columns in the Shipping section being automatically filled.
This feature allows you to add general instructions that apply to all Deliverables.
To Add Instructions:
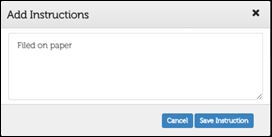
1. From the Assembly page, click Add Instructions to open a dialog box where you can add general assembly instructions.

2. Enter General Assembly Instructions in the text box.
3. You can now:
•Click Save Instruction to save the details.
•Click Cancel to return to Assembly page.
The saved instructions are displayed above the grid in the Assembly section.
Assembly with added attachments and instructions

Add Attachments to Deliverables
It is possible to create a list of items that need to be attached with the assembled Task. You can view the list of items to be attached above the Assembly grid. See Assembly with added attachments and instructions page.
To add an attachment:
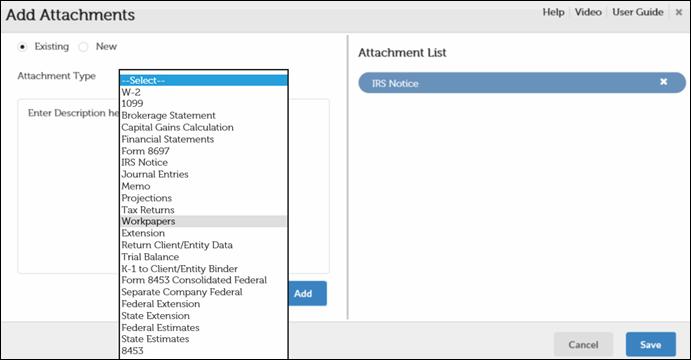
1. In the Assembly page, click Add Attachment to add additional details to the Assembly. The Add Attachments dialog is displayed.

2. From the options available, you can:
|
Select Existing to select an attachment type from the existing attachment drop-down list. |
Select New to create a new attachment type.
|
|
Enter a description in the Description text box. |
Enter the Attachment Type. Enter a description in the Description text box. |
3. Select the relavant items from the Attachment Type drop-down list and then click Add. The added items are displayed under the Attachment List.
4. You can now:
•Click Save to save the added list of items (reminder list) required to assemble the Task. The Attachment list will be displayed in the grey section above the grid. See Assembly with added attachments and instructions page.
•Click Cancel to return to the Assembly page.
|
|
The attachments you select apply to all Deliverables. If an attachment is not applicable to a Deliverable, you need to add a comment. All instructions and attachments will be accessible to all users. |
The Copy From Prior option allows you to copy the following assembly information from the previous year.
•Filing Method
•Person to Sign
•Send To
•Type of Copies
•Number of Copies and Instructions