 .
.The Checklist section of the Control Sheet displays the Checklists associated with the current Task based on the Status to which they are associated. Items in the Checklist need to be completed before the Task is closed.
You can add a checklist for a Task so that when any user creates a new Task, the standard list of Checklist items will automatically populate the Checklist page along with the related information. The standard list of Checklist items is created within the Utilities on a Task Type level.
Only a user with the Manage/Customize Checklists right can add a new Checklist or change an existing checklist item in the Checklist page.
You can do the following from the Checklist section:
•Add or modify a Checklist
•Bulk Edit
•Create Email
•Assign and Unassign a checklist to a user
•Export
Checklist to Excel using the Export to EXCEL icon .
.
•Print
the whole Checklist or specific Checklist items using the print icon .
.

Add a Checklist
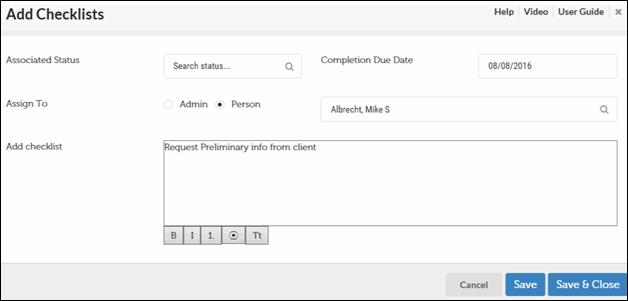
Click + Add Checklist to open the Add CheckLists page where you can assign and add a new Checklist for a Task.
To add a Checklist:
1. Type the Checklist item you want to add in the Add Checklist text box.
2. You can now:
•Click Save to save the Checklist details.
•Click Cancel to go back to the Checklist page without saving it.
•Click Save & Close to save the Checklist details and return to the Checklist page.
3. The new Checklist appears with a notation C in the Checklist page.

Assign a Checklist
You can change the Associated Status, Assigned Person and the Completion Due Date details manually from the Add Checklists page.
Key Terms
Checklist Terms
|
Term |
Description |
|
Associated Status |
The Status of the Task when the Checklist item should be completed. |
|
Completion Due Date |
The due date which triggers a reminder when a particular Checklist item needs to be completed. |
To assign a Checklist item:
1. From the Assign To option: Select Person and select the required user from the Assigned Person drop-down list to whom the Checklist should be assigned.
2. Select Admin to assign the Checklist item to the Administrator.
3. You can now:
•Click Save to save the details.
•Click Cancel to return to Checklist page.
You can also assign a checklist item to a user from the Checklist page.
1. Select the row and then select the required user from the Assigned Person drop-down.
2. Click Assign to assign a checklist item to a user. The checklist will be displayed on the My View page of the assigned user. The user will also receive an email notification on the Checklist items assigned. To reverse a previous Assign action, click UnAssign.
If the Checklist item is assigned to Admin, it will appear in the Admin view of the My View page.

|
|
When you assign a Checklist item, the corresponding Task is displayed on the My View Page under Checklists Assigned to Me. The Status of the Task remains unchanged and the Task itself does not move. The Task should also be moved through the normal workflow using the Move button from the My View, Search, and Control Sheet pages so that Partners, Managers and the Firm Admin can obtain an overall view of the progress of a Task. |
To edit a Checklist item:
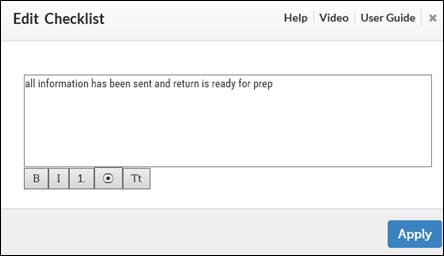
1. Double-click the Checklist item you want to modify to open the Edit Checklist page.

2. Make the necessary changes and click Apply to save your changes.
3. The modified Checklist appears with a notation E in the Checklist page.
To edit the Checklist Status:
You can mark the Checklist Status as Done, Not Done and NA (Not Applicable) from the Status column.
1. Double-click on the Status column corresponding to the Checklist item you want to change.
2. Select the required Status and click Save to save the changes.
3. Enter comments if you are marking the Checklist item as Done for someone else or when you need to provide additional information.
The table that follows describes the action items listed on the Checklist page.
Checklist Action Items and Descriptions
|
Item |
Description |
|
Checklist Page Indicators |
O-Indicates an original/default Checklist item that was added when the Task was created. E-Indicates a Checklist item that was edited. C-Indicates a new Checklist item was added to a Task. |
|
Checklist Status |
Done: To mark a Checklist item as done. Not Done: To reverse the Done action. Not Applicable: To mark the Checklist item as not applicable. |
|
Create Email |
To email Checklist items to any user within the firm. |
|
|
To print the Checklist items. |
|
Export |
To export the Checklist items to Excel or any other format. |
|
Apply Default |
Removes the current information and inserts the default Checklist that is set up in the Manage Checklist Utility for the respective Task Type. |
|
Prior |
Enables you to view prior year Checklists associated with the specific Task (Rollover Tasks only). |
|
Current |
Shows the Checklists associated with a specific Task for the current Period End date. |
|
Assign |
To assign a Checklist item to a user. |
|
Unassign |
To unassign a Checklist. |