 .
.This section of the Control Sheet helps to track all points associated with the current Task. Points include Knowledge/Instructions, Questions, and Review Points.
You can do the following from the Points section:
•Add points from the + Add Point option.
•Post or remove questions from the portal.
•E-mail points to a client or another user.
•Delete a point.
•Export
All Points to Excel using the Export to EXCEL icon .
.
•Print
the whole Points section or specific Points using the print icon .
.
Types of Points and Where Used
|
Point Types |
When Used |
|
Knowledge/Instructions |
When client-specific information such as personal information, late documents, or procedural advice are necessary for the preparation process of a Task. |
|
Questions |
When the tax preparer has questions, clarifications, or needs missing information that should be addressed by another user. Questions are typically raised by preparers and sent to reviewers. |
|
Review Points |
When a reviewer would like to include notes for a preparer to address or fix an issue. |

The numbers beside each Point indicate the number of Open Points out of the total Points logged within the Task.
Click All Points to view all Issues available under Knowledge/Instructions, Questions, and Review Points.
< Prior (Rollover Tasks Only): Displays the Points associated with a Task for the previous year. The Prior year view is read-only.
Current >: Displays the Points associated with a Task for the current year. (The Prior and Current push buttons allow you to toggle between years).
Add a Point
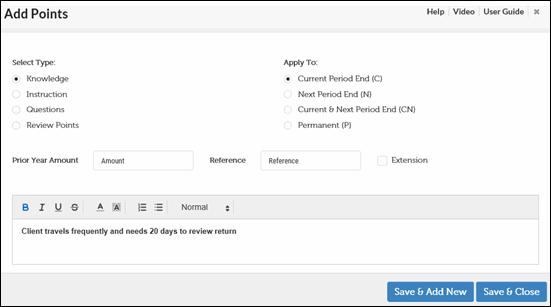
1. In the Control Sheet Points section, click + Add Point, to display the Add Points page.

2. To select a specific type of Point, select the radio button beside it.
3. Specify the Prior Year Amount and the Reference page of the document where the Point is applicable.
4. Select the Extension check box to save the Point for an extended Task. This saves the Points as EQ, ER, and EK to differentiate them from the original Task entries.
5. In the text box, enter the specific Point that you want to raise. To apply formatting changes such as bold, italic, bullets, and headings, select the text and then click the appropriate formatting button below.
6. To save your edits:
•Click Save & Add New to save the details of the Point that was raised and to add a new point.
•Click Save & Close to save the point details and return to the Control Sheet.
Create E-mail
This feature enables you to send an e-mail to a client/entity or another user to get quick information on any Point type. Since XCM is integrated with the email system of your firm (for example MS® Outlook® ) a new email message with the client/entity email address is generated. The client/entity email address used is based on the email programmed in the XCM client database.
To create an E-mail:
1. Select the boxes to the left of the appropriate Questions, Knowledge, Instructions, or Review Points.
2. Click Create E-mail. This will populate the following details in the e-mail:
•Client/entity e-mail address in the To field.
•Information from the Points selected in the message body.
|
|
After the E-mail is generated, the letter M appears in red next to the Point to indicate that an E-mail has been sent to the client/entity. |
Points-Create Email

Carry Over Selections for Points
This feature enables you to carry forward the Points (Knowledge/Instructions, Questions, and Review Points) related to a Task during a rollover. The following table describes the options available to mark these Points as Current Period end, Next Period End, Current and Next Period End, and Permanent.
Carry Over Selections for Points
|
Applies To |
Select this option |
C/O (Carry Over) | ||
|
Current Period End |
When the Points specific to a Task apply to the current period alone. The Points will not carry over to subsequent period ends. In this case, the carry over column appears blank. |
| ||
|
Next Period End |
When the Points specific to a Task apply to the next period end alone. The Points entry will be closed (for the current period) and will automatically roll over with a Status of Open when the Task is rolled over to the next period end.
|
N | ||
|
Current and Next Period End |
When the Points related to a Task apply to both the current and next period end. When this option is chosen, the Points entry will have the Status Open for the current Task and will automatically carry this Status forward to the next Task during rollover. |
CN | ||
|
Permanent |
When the Points specific to a Task apply to the current period and all future Tasks.
|
P |
Add a Response to Points
It is possible to respond to the Points and change their Status to Open or Closed depending on the information provided.
•Leave Open: Allows necessary updates to be made to points and leaves the Status open.
•Closed: Changes the Status to Closed if the response is clear and no further action is required.
To add or edit a response:
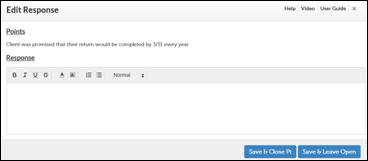
1. Select the row and click the Response column to open the Edit Response page.

2. Enter the response.
3. You can now:
•Click Save & Close Pt to save the response and change the Status to Closed.
•Click Save & Leave Open to save the response and leave the Status as Open.
4. The saved response is displayed in the Response column.
|
|
Points need to be marked Open or Closed. This helps to generate a report on all open and closed Points and address the open issues that need resolution. |