The Save All button located at the top-right corner of the Control Sheet lets you to save the changes done in the Control Sheet. This button is enabled when you make any changes in the Control Sheet.
The Rollover and Move Task action buttons enable you to rollover or move a Task.

Phone and Email Contacts from Control Sheet
The Client/Entity contact information and Task information appears at the top bar of the Control Sheet.
To access the contact number or e-mail address of a
client/entity, move the pointer over the respective phone  and e-mail
  icons.
XCM is integrated with your organization’s mail system. When
you click on the e-mail  icon, an email opens in your firm’s
default mail tool with the client/entity email address pre-populated.
Print Control Sheet
This feature is used to print the complete Control Sheet or specific sections based on your requirements. You can opt to print the Control Sheet in Detailed or Summary form. What you would obtain when you select a specific option is detailed in the table that follows.
|
Detailed (Prints all sections of the Control Sheet) |
Summary (Prints only specific sections of the Control Sheet) |
|
Each section starts on a new page. |
Each section follows from where the last section ends and not on a new page. |
|
General Task Info |
General Task Info |
|
Custom Fields |
X |
|
Staff |
Staff |
|
Deliverables |
X |
|
Points |
X |
|
Checklist |
X |
|
SignOffs |
SignOffs |
|
Assembly |
Assembly |
|
Shipping |
Shipping |
|
eFile |
eFile |
|
Extension |
Extension |
|
Documents |
X |
|
Engagement |
X |
|
Linked Tasks |
X |
|
Details |
Details |
To print the Control Sheet,
8. From the My View page, click on the client/entity for which you want to print the control sheet.
Print Routing Sheet

9. Click Print on the top-right hand corner of the control sheet to view the options in the print menu.
Select Summary or Detailed Print

10. Select Summary or Detailed from the drop-down menu. A preview of the report is displayed for your information.
11. Click Print to obtain a printout of the control sheet.
Save a Control Sheet
A Save button is available in all sections of the Control Sheet to save your changes. You can also use the keyboard shortcut CTRL+S to save data on the Control Sheet. After you have made changes in one or more sections of the Control Sheet, press CTRL+S to save your changes simultaneously.
Unsaved Data Validation
This feature reminds you to save unsaved data when you close
the Control Sheet with the icon  located at the top-right corner of the
Control Sheet. When you click the icon
 , the following dialog box appears.

Do one of the following:
•To save the changes and close the Control Sheet, click Save & Close.
•To close the Control Sheet without saving your changes, click Close without saving.
•To
return to the Control Sheet, click .
.
Sort Items in the Grid using Column Headings
This feature allows you to sort the information in grid sections such as Deliverables, Points, Checklist, Assembly, Shipping, eFile, Extension, Linked Tasks and Details. Click the column heading in a grid to sort the items in ascending or descending order.
Action buttons
The action buttons allow you to navigate and manage the following:
•Move Task
•Rollover
Move Task and Rollover Action buttons disabled with Unsaved Data
The Move Task and Rollover action buttons on the top bar of the Control Sheet are disabled when there is unsaved data in the Control Sheet. When you make any changes in the Control Sheet, XCM immediately disables the Move Task and Rollover action buttons.
This is to restrict a user from being able to move or rollover a task without saving the data entered. The two action buttons are enabled only after you save the changes in the Control Sheet.
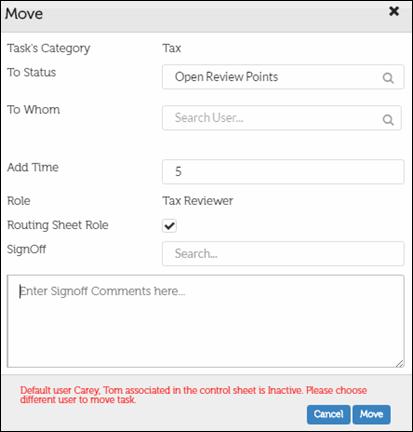
This feature enables you to move a Task to any Status and User as determined by the workflow of your firm. For more details, see Move a Task in the My View page.
A warning (W) or required (R) notification to SignOff appears after you move a Task. There are two SignOff fields on the Move Task page.
SignOff drop-down list: Shows the available SignOffs for a Task. When a Task is moved, if a SignOff notification prompt is associated with the Task being moved, the assigned notification prompt will appear. These notification prompts either warn you (Warning Notification) that SignOffs should be completed prior to moving a Task or inform you that the Task cannot be moved without the SignOff being completed (Required Notification).
SignOff comments: Text box where you can provide additional information on the SignOff completed related to the Task being moved.
To Move a Task:
1. Click Move Task at the top-left of the Control Sheet to open the Move page.
2. Select or confirm the next Status in the To Status drop-down list. This will be the Status to which the Task is moved.
3. Select or confirm the user in the To Whom drop-down list. This will be the person assigned to the Task in the next Status. When a user responsible for a given step in a Task is inactive, you will see a message "Default user <user name> associated in the control sheet is inactive. Please choose different user to move task" at the bottom of the Move page.
4. In the Add/Change Time text box, enter the actual time spent working on the Task. This time is added to the corresponding role and also added to the time entered in the Control Sheet.
5. Select the Routing Sheet Role check box to assign the user (To Whom the Task is assigned), with the Primary Role, if required. You can enable the Routing Sheet Role only if the workflow is mapped for the specific Task.
6. From the SignOff drop-down list, select the appropriate SignOffs.

7. Enter the SignOff Comments.
8. You can now do one of the following:
•Click Move to move the Task to the selected Status and user. You can see the moved Status (Current Status) displayed at the top-left corner of the Control Sheet.
•Click Cancel to return to the Control Sheet.
Rollover a Task
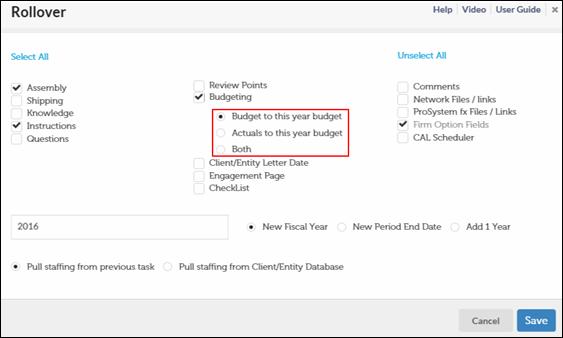
This feature enables you to manually rollover one or more Tasks from the current year to the next year after the Tax return has been completed. All the options in the Rollover page that are associated with a Task can be carried forward during the rollover.
To Create a Rollover:
1. Click Rollover at the top-left of the Control Sheet to open the Rollover page.

1. In the Rollover page, select specific details that you want to rollover.
•To select all options to be rolled over, click Select All.
•To clear all selected options, click Unselect All.
When you select the Budgeting check box, three options are displayed, Budget to this year budget, Actuals to this year budget, and Both. Select the relevant radio button.
2. To specify the year you want the Task to be rolled over to, select the radio button beside one of the options: New Fiscal Year, New Period End Date, Add 1 Year.
3. Select the appropriate staffing option: Pull staffing from previous task or Pull staffing from Client/Entity Database.
4. You can now do one of the following:
•Click Save to save the details selected for Task rollover.
•Click Cancel to return to the Control Sheet.