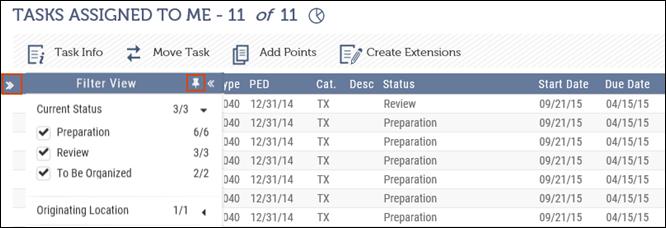
 located on the left side of the My View
grid enhances your ability to retrieve required information in the My View grid
quickly and easily.
located on the left side of the My View
grid enhances your ability to retrieve required information in the My View grid
quickly and easily.The My View page contains a grid with the details of various Tasks.
The Task Info, Move Task, Add Points, and Create Extensions action buttons are displayed after you select one or more Tasks from the grid.
The Select All check box beside Client/Entity is used to select a maximum of 50 consecutive Tasks in the grid.
The Selected button at the top-right of the grid shows the number of items selected. After you select Tasks from the grid, click Selected to bring the selected items to the top of the grid.
The Filter Slider  located on the left side of the My View
grid enhances your ability to retrieve required information in the My View grid
quickly and easily.
The Task Type column displays the Task Code. To display the full Task Type name, mouse over the specific Task Code.
You can export the My View Grid to Excel using the
Export to Excel icon .
.

My View Grid Table
|
No. |
Name |
Description |
|
1 |
Client/Entity |
Represents the Client/Entity name. Click on this link to reach the Control Sheet. |
|
2 |
Number |
Indicates Client/Entity Number. |
|
3 |
Type |
Indicates type of Task such as Tax-1040, 5500, 706, FS-Audit. |
|
4 |
Period End Date |
Date set by the user for the client/entity to file the tax return. |
|
5 |
Cat |
Indicates Tax Category that a Task Type belongs to, such as Tax (TX), Financial (FS), Bookkeeping/Accounting (BK), and OT (Other). |
|
6 |
Description |
Shows additional descriptions of a Task. |
|
7 |
Status |
A Status is the current stage of the project lifecycle that the Task is in. Examples are Preparation, Review, or Complete. |
|
8 |
Due Date |
Displays Due Date of the next Deliverable associated with a Task. Due Dates that are overdue are displayed in red. |
|
9 |
Last Changed Date |
Shows the date when the information on the Task was last updated. |
|
10 |
ADD |
An internal due date (expected delivery date) that can be set by a user. |
|
11 |
Who has |
(Who has the Task).The initials of the user who is currently assigned to the Task. |
|
12 |
Ext |
Displays the status of the Extended Task. IP indicates an Extension Task is In Process. Click on the IP (blue hyperlink) to open the extension page for the corresponding Task. NIP indicates that an Extension Task is Not In Process. |
|
13 |
Ori |
Indicates originating location of the office where the client is located. |
|
14 |
Curr |
Location (Current location) defaults to the location of the user assigned to the Task or if not assigned, the location of the user who created the Task. |
|
15 |
Deliverable Count |
Shows the number of deliverables that have an “In Process” status/the total number of Deliverables associated with the Task. Click on the value to open the Deliverable page for the corresponding Task. |
|
16 |
Pts |
Shows the number of open Points associated with a Task/thetotal number of Points.Click on the value to open the Points page for the corresponding Task. |
|
17 |
Ckl |
Shows the number of Checklist items with open status/the total number of Checklist items.Click on the value to open the Checklist page for the corresponding Task. |
|
18 |
DTL |
Shows audit trail of how the Task has moved in XCM. Gives details of different users and the hours they have spent on the Task. |
|
19 |
P |
Indicates priority of the Task. |
|
20 |
D |
Indicates level of difficulty of the Task. |
|
21 |
PR |
Represents portal, click on the PR hyperlink to open the portal page for the corresponding Task. |
|
22 |
Row Selection Indicator |
Shows the number of Tasks selected from the grid. |
|
23 |
Task Info |
Includes Task specific information on Deliverables, Assembly, Shipping, eFile, SignOff, Engagement Info and Extension. |
|
24 |
Move Task |
Moves the Task through the workflow process of your firm. |
|
25 |
Add Points |
Allows you to add Points while working on the Tasks assigned to you. For example, Knowledge, Instructions, Questions and Review Points. |
|
26 |
Create Extensions |
Creates an extension Task for the selected Task . |
Personalization
XCM allows you to view data dynamically based on your requirements. You can customize the column width and the content to be displayed in the My View page and Search Results page. Changes made in the column selector (show/hide) and column widths are retained even after you leave the page.
My View Filter Slider
The Filter Slider  located on the left side of the My View
page enhances your ability to retrieve required information in the My View grid
quickly and easily. Click
  to launch the Filter View.
Filter View

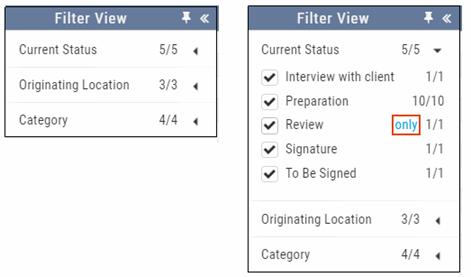
The Filter View displays the following fields and
allows you to select the most relevant items you want to view in the My View
page. Click the left arrow icon beside the relevant field to display the
items listed beneath it as shown in the following figure.
Filter View with check box and only filter

To filter the data with multiple criteria, select the check boxes beside the relevant items. This displays the data pertaining to the selected items in the My View grid.
The only filter appears when you move the pointer over the items beneath the fields. You can filter the data using the check box or only filter.
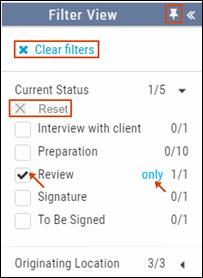
Filter View – only filter and Reset

For quick filtering to a specific item that you want to display in the My View grid, move your cursor to the relevant item to display the only filter. Click only. The grid now displays only the selected item, for example Task Type 1040.
Items without a check mark will not be displayed in the My View grid. Click Reset to bring back the items to their default state.
Clear Filters
This option lets you to clear all the filters you have applied.
Click Clear filters to clear the selected check boxes from all sections under the Filter View in one click.
Pin the Filter View to the My View Grid
The pin  icon allows the Filter View to be open
or closed. You can pin the Filter View to the My View grid using the pin
  icon. This helps you to
quickly retrieve specific information that you had selected with a few
clicks.
When the filter is pinned, it looks like this:  and the Filter View remains opened
whenever the My View Page is open. Click the pin icon again to unpin
  or close the filter view.
Customizing the My View Grid
You can customize the columns that are displayed in the My View grid and also the order in which they are displayed. This customization is done from the Manage Custom Grid Settings utility.
Navigation from the My View Grid
From the My View grid, you can do the following using the action buttons displayed at the top of the My View grid.
•Review Task Information
•Move a Task
•Add Points
•Create Extensions
Navigation-Action buttons
