You can customize the My View grid and the Search grid from the Manage Custom Grid Settings utility.
To customize the My View/Search grid, you must first select the relevant columns using the Manage Custom Grid Settings utility.
From the Utilities menu, select Setup Utilities > Manage Custom Grid Settings to open the My View/Search tabs page.
Manage Custom Grid Settings-My View/Search

|
|
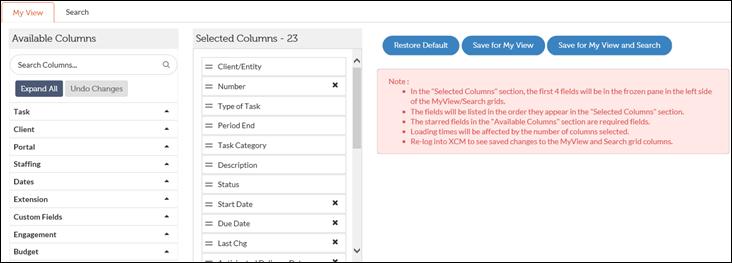
You can select up to 33 fields to display in either grid. Loading times will be affected by the number of columns selected due to the volume of data being requested. The first 4 fields in the Selected Columns section will be in the frozen pane in the left side of the My View grid/Search grid. |
The My View grid and Search grid are customized in the same way.
Click Expand All to view all items under each section in one click.
In the Available Columns section, you can select items from various sections such as Task, Client, Portal, Staffing, Dates, Extension, Custom Fields, Engagement and Budget.
To view and select items from individual section, click the icon beside it and then select the check box corresponding to that item you want to include in the Selected Columns section.
Fields marked with an asterisk (*) indicate required columns.
The fields displayed in the Selected Columns section will appear in the My View grid /Search grid. Fields with an x icon indicate that they can be removed from the selection.
My View/Search-Available Columns

To pick columns to be included in the My View/Search grid, select the relevant tab and do the following:
1.
From the My View/Search tab, click the upward arrow icon beside the relevant section in the
Available Columns section to display the available fields.
2. Select the check box beside the relevant fields. The selected field is added in the Selected Columns section. The Selected Columns section shows the number of columns selected.
3. Click Undo Changes to undo the changes you have done. This will clear the selected check boxes under Available Columns and remove the corresponding field names from the Selected Columns window.
4. To save the selected columns, click any one of the options as described in the following table.
|
My View |
Search |
|
Restore Default to restore the My View grid to its default view. Save for My View to save the selected columns to appear only on the My View grid. Save for My View and Search to save the changes you have made to both the My View grid and the Search grid. |
Restore Default to restore the Search grid to its default view. Save for Search to save the selected columns to appear only on the Search grid. Save for Search and My View to save the changes you have made to both the Search grid and My View grid. |
5. For the changes to take effect, you need to re-login to XCM.
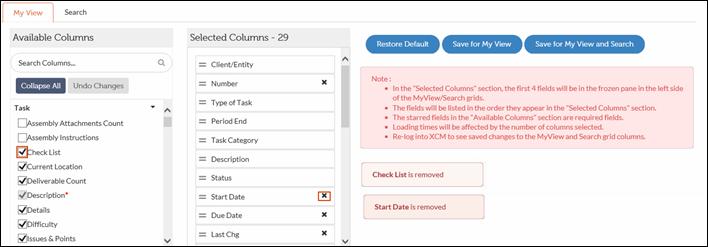
Remove Columns
To remove a column, do one of the following:
•In the Available Columns section clear the check box beside the field you want to remove. This removes the corresponding field from the Selected Columns section.
OR
•In the
Selected Columns section, click the  icon beside the relevant field you want
to remove.
My View/Search-Remove Columns
