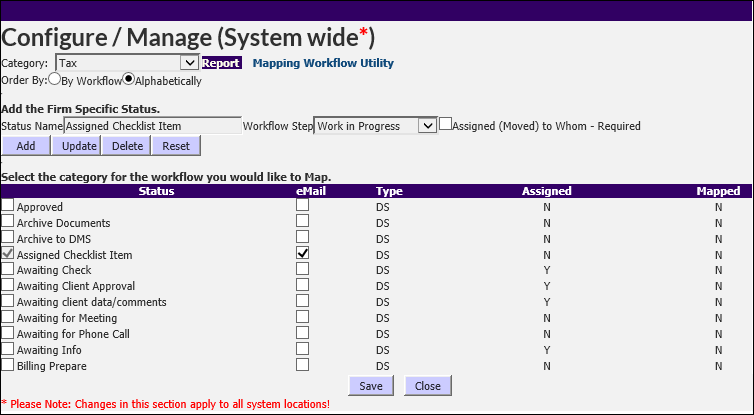
XCM provides four workflow categories (Tax, Financial, Bookkeeping/Accounting, and Other). The categories reflect a total of over 185 Statuses that you can enable or disable in order to customize your workflows.
From the Utilities menu, select Setup Utilities > Manage Workflow Statuses.
To add a new workflow Status:
1. From the Utilities menu, select Manage Workflow Status to open the Configure/Manage (System wide*) page.
Configure/Manage (System wide*)

2. Select the Tax category from the Category drop-down list.
3. Under the Add the Firm Specific Status section, enter the Status Name and Workflow Step. If you select the Assigned (Moved) to Whom – Required check box, you are required to choose the staff member to whom the Task may be assigned when workflow mapping is done.
4. Click Add to save the details. The Status is now displayed in the Status list.
5. You can now do the following:
•Select the check box to allow the Status to be used by others in the firm or clear the check box to hide a Status point from users.
•Select the corresponding email check box to activate an email notification to a user to whom this Status is assigned in the workflow process when the Task is moved to that user.
•Clear the email check box to exclude email notifications.
6. After you select the appropriate options, click Save.
The Statuses you have enabled will be displayed whenever a user creates a Task associated with the specific Tax category.
Edit a Workflow Status
To edit a Workflow Status:
|
|
A Status can only be edited if it is not mapped to a workflow and if no tasks currently reside in that Status. |
1. From the Utilities menu, select Manage Workflow Status to open the Configure/Manage (System wide*) page.
2. Select the Tax category from the Category drop-down list. The Status points are displayed based on the Tax category selected.
Add a Workflow Status (Tax)

3. Highlight the row (Status) you want to edit. The corresponding/highlighted Status is displayed in the Status Name text box.
4. Make the necessary changes to the Workflow Status.
5. Click Update to save the changes.