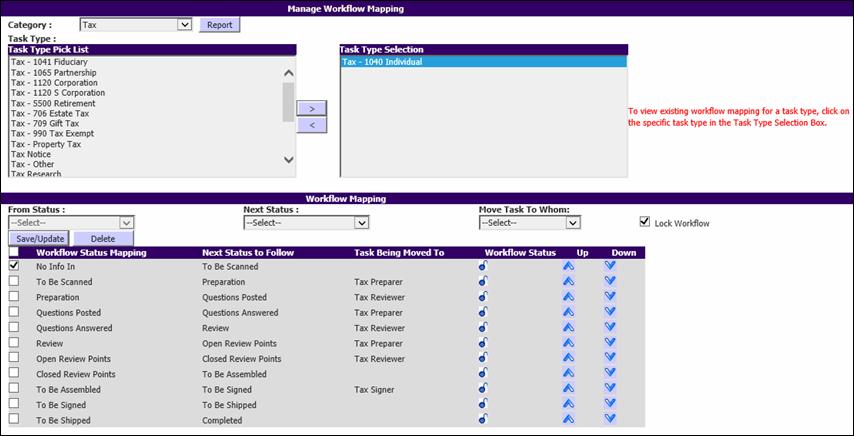
Manage Workflow Mapping
Workflow mapping allows you to configure the workflow
according to your requirements based on Task Types. This feature is used to
provide customize workflow processes for users as they process their work.
After the workflow for a specific Task Type is mapped, the
next Status and the name of the staff to whom the Task should be assigned are
shown on the Move Task page with the configured mapped workflow.
|

|
If you want to ignore the mapped workflow selection,
choose another Status or User. However, this is not possible if the Status
you select has been locked down by the firm’s administrator (who might
want to limit interns from moving a Task to a specific Status). |
From the Utilities menu, select Setup Utilities >
Manage Workflow Mapping.
Manage Workflow Mapping

Create Workflow Mapping
To map a Task Type to a step in
the workflow process:
1. In
the Manage
Workflow Mapping page, from the Category drop-down list choose
the Category for which the workflow has to be mapped.
2.
From the Task Type Pick List on the left, choose the Task Types to
be included. Press the Ctrl and Shift keys together to choose more
than one Task Type.
3.
After the Task Type is selected, click > to move the selection
to the Task Type Selection column on the right.
4.
Select a Task Type in the Task Type Selection column to view the
existing workflow associated to that Task Type, if any, under the Workflow
Mapping section.
Manage Workflow Mapping-Form1040 Individual

5.
From the From Status drop-down list, select No Info In.
(The Workflow Mapping process usually starts with the Status No Info
In.)
6.
From the Next Status drop-down list, choose the appropriate
Status.
7.
From the Move Task to Whom drop-down list, choose the Staffing
Assignment role to which the Task will be moved automatically based on Status
selected in the Next Status drop-down. To move the Task to the Admin
group, leave the Move Task to Whom box blank.
|

|
During the actual workflow process, when the Task is
moved to this Status, the Move Task To Whom field on the Move Task
page will display the name of the user who holds the Staffing Assignment
role for that Task. |
8. You
can move the order of workflow Statuses using the Up and Down
buttons in the corresponding row.
9. To
indicate that a step is mandatory and cannot be skipped, select the Lock
Workflow check box. The workflow Status icon for this step will then appear
locked.
10. Click
Save/Update to include the step into the workflow.
Repeat the same procedure to complete the rest of the workflow
steps.
A workflow does not have to be a linear set of steps. It can
be a branching decision tree with multiple next Status selections for a current
Status. This is achieved by not specifying a next Status for a step, or by
simply not locking that entry (the Status selections themselves that appear as
choices in the Move Task page are controlled by the Manage Task Type utility).
It is also possible to have multiple Statuses with the
identical next Status configured in the next step in the workflow.
For example, you could configure the workflow to move from
Closed First Review Points to To Be Assembled. When the user moves
the Task out of the Closed First Review Points Status, XCM recommends
that the Next Status to Follow would be To Be Assembled.
Workflow Status Mapping

You can then override the workflow mapped, to move the Status
from Closed First Review Points to Secondary Review, thus choosing
to move the Task to Secondary Review before moving the Task to To Be
Assembled. After the Task is moved out of Secondary Review, XCM
recommends that the Next Status be To Be Assembled, based on the
workflow mapped.
©
Wolters Kluwer N.V. and/or its subsidiaries. All rights reserved.


