A firm Administrator should change the Firm Fiscal Year date annually.
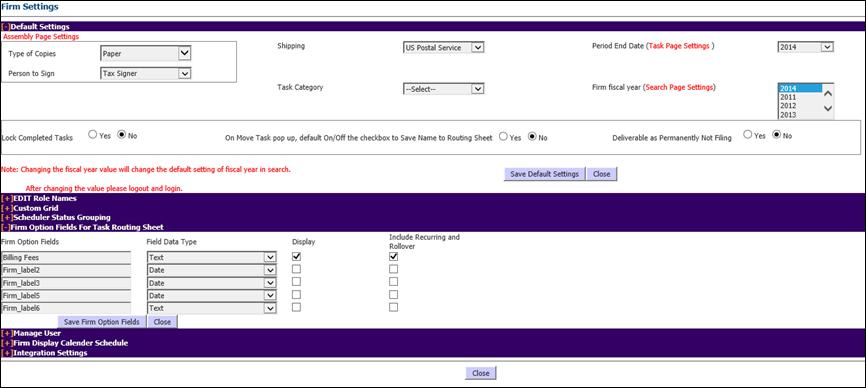
The Manage Settings and Defaults feature provides the option to configure the default Shipping method, Firm fiscal year, and Task Category when you create a new Task.
From the Utilities menu, select Setup Utilities > Manage Settings and Defaults. This opens the Firm Settings page.
You can do the following in the Firm Settings page:
•Manage staffing roles.
•Customize the search screen page.
•Create additional fields for the Task Routing sheet.
•Manage user groups.
•Customize staff role names. XCM allows each firm a minimum of 9 and a maximum of 50 custom role names.
The Firm Fiscal Year changes the default fiscal year for new Tasks created using the fiscal year end for the client/entity selected. The Firm Fiscal Year is also the default date for the Search page and Reports.
|
|
A firm Administrator should change the Firm Fiscal Year date annually. |
Firms also have the ability to determine if they want to allow all users, or only those with the Override And Move Tasks Out Of Completed Status user right the ability to modify Tasks after they are moved to the completed Status.
Lock Completed Tasks
If the Lock Completed Tasks setting is turned on, then Tasks will not be allowed to move out of the Completed Status and Task information cannot be updated.
Firms that decide to lock completed Tasks will have to assign a user right to allow selected users the ability to modify completed Tasks.
Firms that decide not to lock completed tasks will not see the Override And MoveTasks Out Of Completed Status user right since it is not applicable to their process.
Lock Completed Status

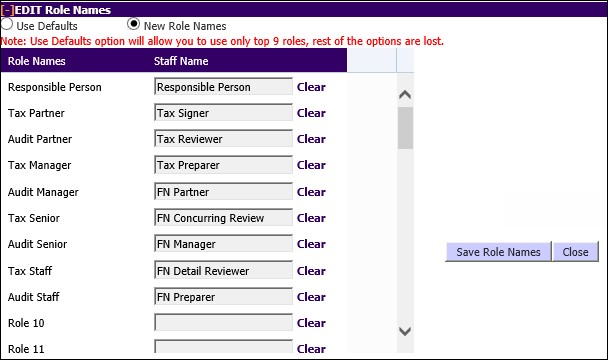
For complete integration with your firm’s nomenclature, XCM allows firms to customize the name of each Staffing Assignment Role. All interfaces in XCM will display the customized role name, not the static XCM label. XCM is designed so that a firm can have a minimum of 9 and a maximum of 50 custom role names.
From the Default Settings section of the Firm Settings page, you can:
•Configure the Assembly Page Settings: Select appropriate values from the drop-down fields such as Type of Copies, Shipping, Period End Date, Person to Sign, Task Category and Firm fiscal year.
•Lock Completed Tasks.
•Enable or disable the Routing Sheet Role option in the Move Task page (My View Page).
•Mark the Deliverable as permanently Not Filing.

Click Save Default Settings to save the changes.
Role Names can be edited in the EDIT Role Names section of the Firm Settings page.
From the Utilities menu, select Setup Utilities > Manage Settings and Defaults to open theFirm Settings page.
XCM allows firms to customize the name of each Staffing Assignment Role to enable complete integration with your firm’s nomenclature. All interfaces in XCM will display the customized role name, not the static XCM label. XCM is designed so that a firm can have a minimum of 9 and a maximum of 50 custom role names.
To change the Staffing Assignment Role names:
1. In the Firm Settings page, click EDIT Role Names to open the EDIT Roles Names section.
2. In the EDIT Role Names section, select the New Role Names option.
3. Type the name of the staff for the role and click Save Role Names.
Edit Role Names

The new name(s) will be reflected on the Control Sheet and also across XCM wherever a role appears.
If your firm uses XCM integration with ProSystem fx Document®, Manage Firm Settings will have additional configurations. Refer to the XCM ProSystem fx Document® Integration Setup Guide for more details.
The Firm Option Fields section enables you to add custom fields to the Custom Grid utility. Through this utility, you can add up to 25 custom fields.
Firm Settings-Firm Option Fields

You can see these added fields in the Advanced Search page as well.
The data available in the Custom grid fields can be used in the Keyword field for advanced search.
Manage (Categorize) Users
The Manage Users section of the Manage Settings and Defaults Utility enables you to create Expertise, Industry, Department, Title/Level, and Niche/Group profiles. These profiles can be applied to your users through either the Manage Users or the Bulk Manage Users and User Rights utilities. Categorizing your users will allow you to narrow down your employee search within the RAS/CAL add-on.
The grid comes with pre-populated profiles. You can add or replace elements of the profiles to best match the attributes within your organization.
From the Expertise grid you can add areas of proficiency for each of your users. You can review a user’s profile and identify their core strengths.
Manage User-Expertise

Add a New Record
To add a new record, within any of the five profile groups, click Add new record.

1. Enter the Expertise Name, Expertise Description, and Expertise Comments.
2. Click Insert to update the details.
This process can be used to update Expertise, Industry, Department, Title/Level, and/or Niche/Group listings. After the list items have been added, they are available to apply to user accounts within the Manage Users and the Bulk Manage Users and User Rights utilities.
The Industry section allows you to build areas of industry expertise for your users. To build areas of industry expertise, look at a user’s profile and identify industry groups in which the staff member is proficient. XCM provides sample Industry selections you can build from.
Manage User-Industry

The Department section allows you to assign users to specific departments within your organization. You can look at a user’s profile and assign the departments to which the staff member belongs. XCM provides sample Department selections you can build from.
Manage User-Department

The Title/Level section allows you to build titles and/or levels within your organization. You can look at a user’s profile and assign the level for that user within your organization. XCM provides sample Title/Level selections you can build from.
Manage User-Title/Level

The Niche/Group section allows you to build sub-groups that your users may be a part of. You can review a user’s profile and identify the Niche/Group(s) where the staff member is proficient. XCM provides sample Niche/Group selections you can build from.
Manage User-Niche/Group
