
The logo must be in JPEG format and the size of the logo should be between 350 pixels (width) x 75 pixels (height) and 1000 pixels (width) x 300 pixels (height).
XCM Portal (XCMp) strictly adheres to the regulations pertaining to document exchange and guarantees a safe transmission of files containing sensitive data. The portal also offers a secure and efficient means to transfer client/entity documents and provides an integrated interface for exchange of client/entity documents.
With XCMp, users, clients/entities, and authorized vendors can exchange sensitive data without relying on a third-party application. XCM pioneered the concept of Portal technology integrated with workflow. Since users are familiar with XCM, it was an easy evolution to integrate XCMp as a product extension.
To enable XCMp within your existing XCM solution, contact your sales representative or contact the XCM support team.
With the Manage Portal utility, your firm can manage file retention and email reminders. You can also upload your firm’s logo to customize the appearance of XCM Accelerated Workflow Management. To be able to use the XCM portal utility, your firm first needs to be activated. Your firm administrator can then assign one or more users the Manage Portal right.
Users with the Manage Portal right can view the Manage Portal utility under the Utilities menu.
From the Utilities menu, select XCM Portal Utilities > Manage Portal. This opens the Manage Portal page.
To upload the logo of your firm:
1. In the Manage Portal section, click Choose File to select the logo of your firm.
|
|
The logo must be in JPEG format and the size of the logo should be between 350 pixels (width) x 75 pixels (height) and 1000 pixels (width) x 300 pixels (height). |
Upload Logo

2. Select the logo and click Save. Your firm logo is now visible to your clients who access the secure portal.
The File Retention utility allows you set the period for which files are retained on the client portal. The minimum retention duration is 45 days and the maximum duration is 90 days.
The File Retention duration is set from the Manage Portal page.
Retention duration is calculated from the date a file is uploaded. For security reasons, files are permanently deleted from the portal when the retention duration completes. This permanent deletion of files is applicable to both files uploaded by clients/entities as well as files uploaded by users in your firm.
Set Portal Retention Duration

This utility allows you to configure the duration of inactivity after which Portal will trigger reminder emails to your client/entity in the manner configured. Inactivity duration is from 10-15 days.
When an action takes place within the portal, notification emails are sent to clients/entities or the Responsible Person at the client firm. Firms can control whether emails have to be sent for each action, the content of those emails, whether the notification is a reminder, and how many days of inactivity will trigger the reminder.
You can configure notification emails under General Settings > Email Settings.
Mange Portal-Email Settings

Options available are:
•Turn off all Automated Portal emails. In this case, no emails will be sent to clients from the portal.
•Turn on selected Portal emails. Selected emails will be sent to clients based on the duration configured.
For each of the emails you enable, the default content of the notification email will be displayed below.
Email Notifications-Default Content
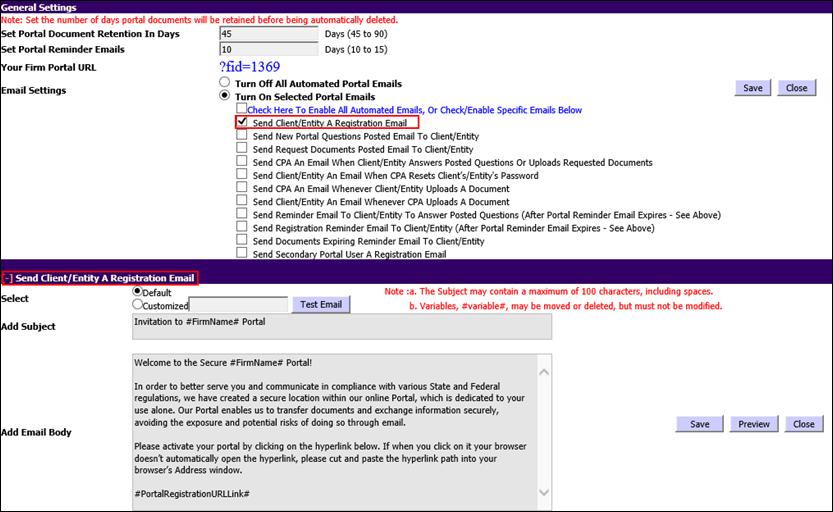
You can either proceed with the Default content or you can adapt the Customized content. Select the appropriate option.
Email Notifications-Customized Content

•If you have customized the content, click Save.
•To view how the email will look when it is sent to the client, click Preview.
Use the Test Email facility to test how the email will appear to the client. To send a test email:
1. Select the type of email (Default or Customized) and draft custom content if applicable, then type an email address in the text box provided.
2. Click Preview to view how the email would display to the client.
|
|
Text between two # characters indicates then it is a variable that XCM will fill in based on the condition. You can delete the variable if it is not required for a generated email. |
4. Click Test Mail to send a test mail to the client.
Add and Delete Client/Entity Portal
It is possible to add or delete a Client/Entity Portal only after your firm has been configured in the XCM Portal.
A valid email address is required to add a client/entity portal. Registration for and access to the client/entity portal is based on this email address.
1. From the Utilities menu, go to Client/Entity/Group Utilities and then choose Manage Clients/Entities.
Choose/Search Client-Add a Client Portal
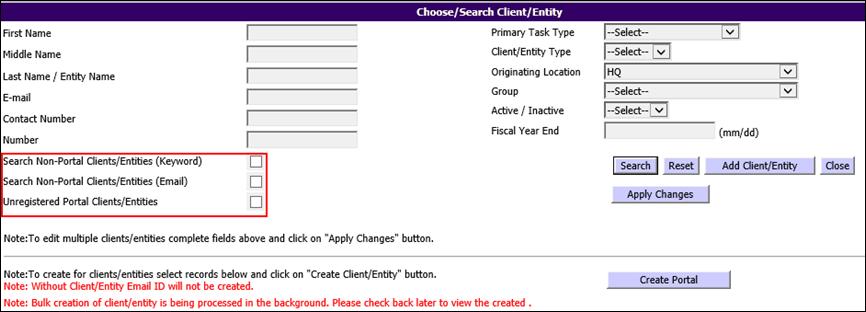
2. Search for the client/entity that you want to provide a client/entity portal using the advanced search features such as Search Non-Portal Clients/Entities, Search Non-Portal Clients/Entities with Email ID, and Unregistered Portal Clients/Entities.
Choose/Search Client/Entity-Go to Portal
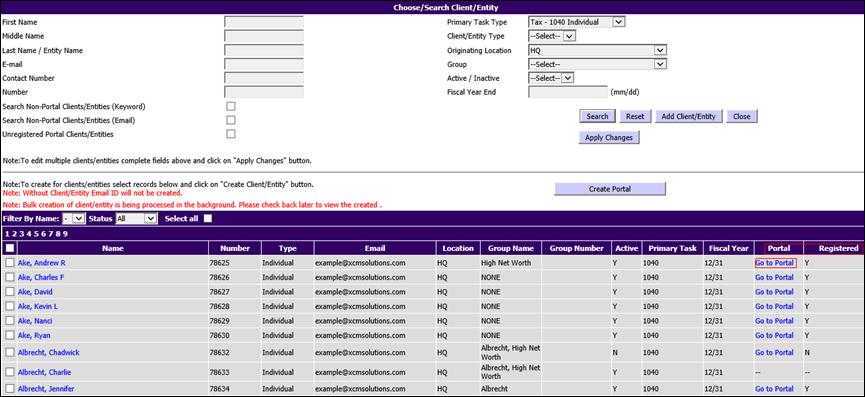
3. The client/entity list obtained after the search has two additional columns; Portal and Registered.
The Registered column indicates whether the client/entity has formally registered to the Portal. Y or N is displayed based on the client/entity registration Status (Y-registered, N-not registered).
If the client/entity already has a portal, click the Go to Portal link under the Portal column.
4. Select the check boxes beside the names of the non-registered clients/entities for whom you want to create a portal, and click Create Portal.
•Select the check box next to the Client/Entity Name to select all clients/entities displayed in the page.
•Select the check box beside the Select all seen at the top-left of the search result screen to select all clients/entities from all pages.
5. A dialog box appears when you click Create Portal.

6. You can now:
•Click OK to create portal for the selected client/entity.
OR
•Click Cancel to return to the Choose/Search Client/Entity page to verify or change the client/entity email address.
<Placeholder-Portal screen and portal activation message>
|
|
When a client/entity portal is created, a notification email is sent to the client/entity address with this information. The email contains several hyperlinks. One hyperlink leads the client/entity to the location where they can activate the portal, set up security, and create a password. In XCM multiple clients/entities can have the same email address. In such cases, when a client/entity logs in to XCM they can navigate to the client/entity portals of all clients/entities with the same email address. |
Resend Registration
A firm user can send another registration e-mail to a client/entity using MS® Outlook®, if the client/entity has not registered on portal.
To resend registration, do the following:
1. From the Utilities menu, go to Client/Entity/Group Utilities and then choose Manage Clients/Entities.
2. Search for the client/entity.
3. Click on the client/entity name to open the Client/Entity Details page.
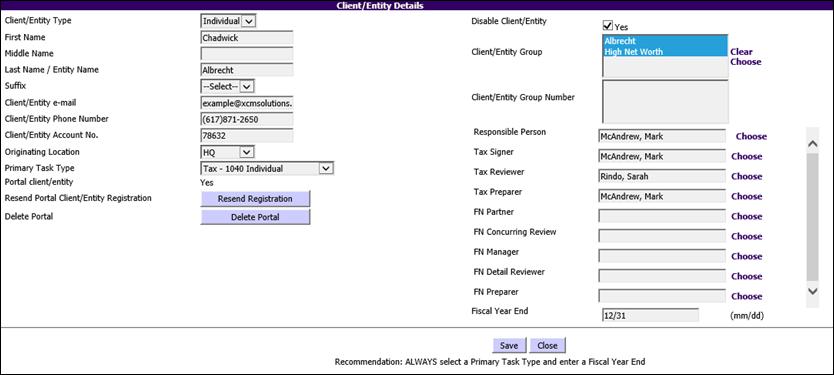
4. In the Client/Entity Details page, click Resend Registration to open MS® Outlook® populated with a portal registration mail.
Client/Entity Details
Delete a Client/Entity Portal
To delete a client/entity portal, do the following:
1. From the Utilities menu, go to Client/Entity/Group Utilities and then choose Manage Clients/Entities.
2. Search for the client/entity.
3. Click the client/entity name to open the Client/Entity Details page.
Client/Entity Details-Delete Portal
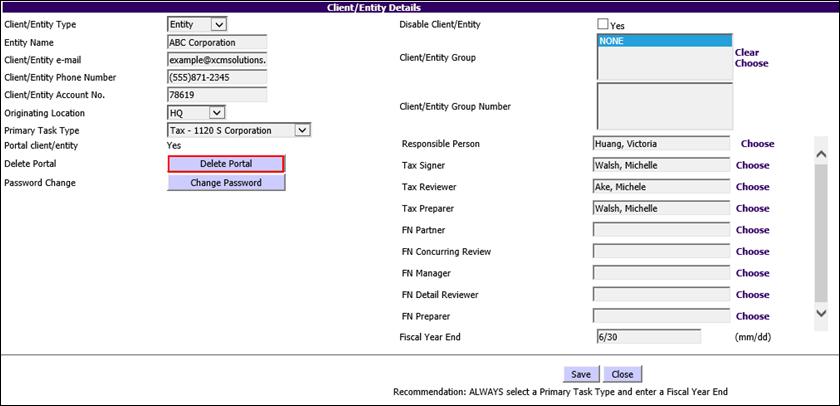
4. In the Client/Entity Details page, click Delete Portal to remove a client/entity portal from the XCM site.
|
A client/entity portal that has been deleted can be re-created. Follow the procedure in Add a Client/Entity Portal. |
Accessing a Client/Entity Portal
XCM has multiple ways to access the client/entity portal. One of these methods is
1. From the Utilities Menu, go to Client/Entity/Group Utilities and then choose Manage Clients/Entities.
2. Search for the desired client/entity.
Choose/Search Client/Entity
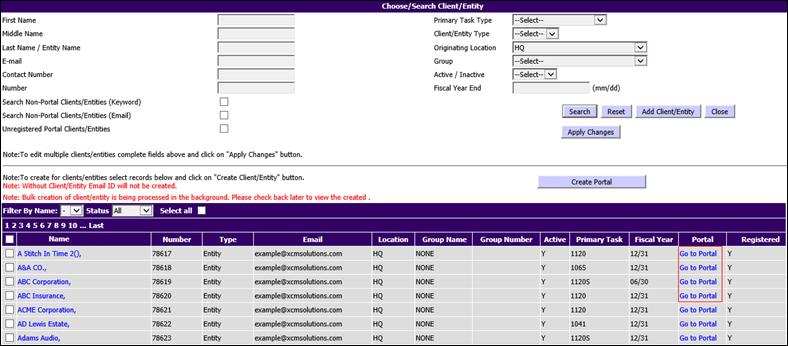
3. Under the Portal column, click on the relevant Go to Portal link.
<Placeholder-details of client portal>