The Manage Clients/Entities utility allows you create new client records as well as to change client/entity details in bulk.
From the Utilities menu, select Client/Group Utilities > Manage Clients/Entities.
Add a Client/Entity
Clients can be both individuals and organizations (entities). Both types of clients are created in a similar manner.
To add a client/entity:
1. From the Utilities menu, go to Client/Entity/Group Utilities and select Manage Clients/Entities. This opens the Choose/Search Client/Entity page.
Choose/Search Client/Entity

2. Click Add Client/Entity to open the Client/Entity Details—Add Client/Entity page where you can add details of the new client/entity.
Client/Entity Details—Add Client/Entity
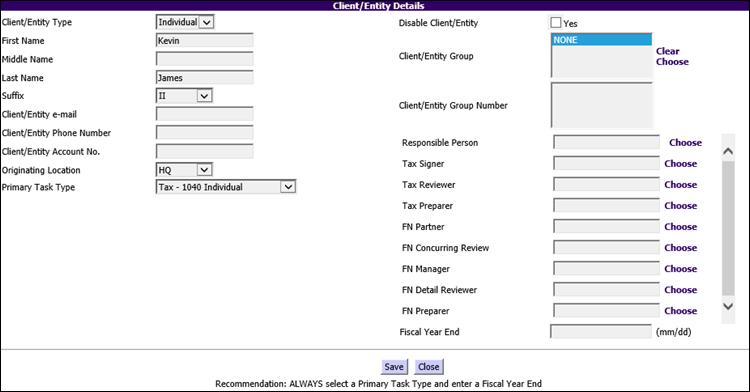
3. The mandatory fields required to create a new client/entity are: Client/Entity Type, Client/Entity Name, Primary Task Type, Responsible Person and Fiscal Year End.
|
|
If you are adding an entity, the First Name and Middle Name are not displayed. |
4. Click Choose beside each staff role to open the Select Staff page where you can select the staff to be associated with this client/entity.
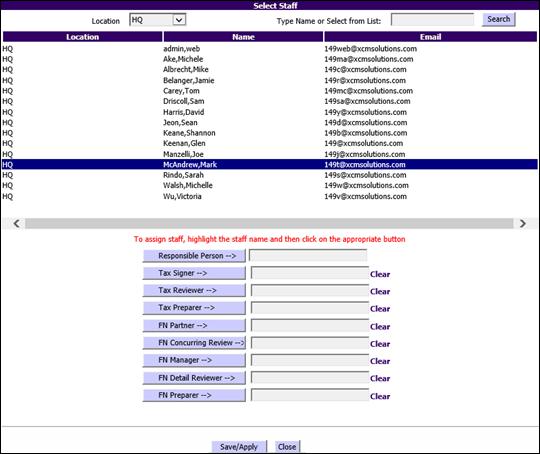
5. In the Select Staff page, click the name of a specific staff member to highlight it and then click the corresponding role, for example: Responsible Person, Tax Signer, to assign the selected user to that role.
6. When all the staff roles you require have been selected, click Save/Apply. You will now return to the Client/Entity Details page.
7. Click Save in the Client/Entity Details page to save the details of the client/entity you have added.
Clients/Entities with identical names
XCM allows you to create clients/entities with identical names as long as they have unique client/entity numbers.
If the client you are creating is an individual, all four name fields (First, Middle, Last, Suffix) are included in the uniqueness check. If you attempt to add a client/entity with the same name as an existing client/entity and also the same client/entity Number, you will see the following error message.
Add a Client/Entity-Error message

Edit a Client/Entity
You can edit client/entity details from the Client/Entity Details page. It is also possible to do a bulk edit of client/entity details such as Primary Task Type, Client/Entity Type, Originating Location, Group, Active/Inactive and Fiscal Year End.
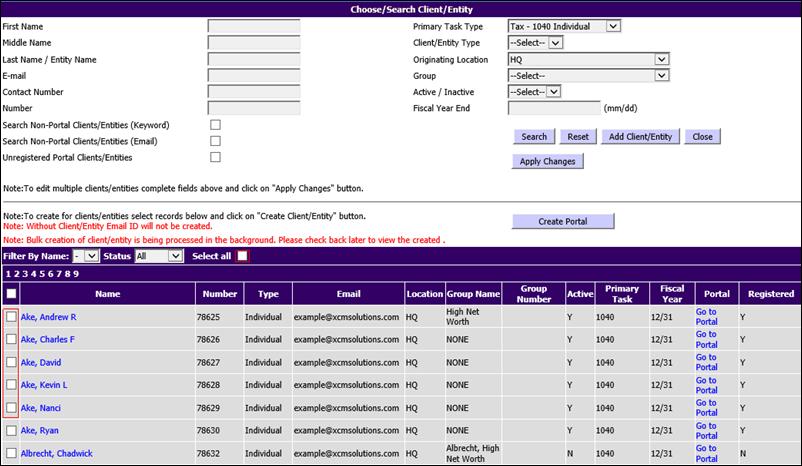
In the Choose/Search Client/Entity page, enter the search criteria or use the available filters to search for the client/entity you want to edit. The search results are displayed below.
Choose/Search Client/Entity
To edit a client/entity:
1. Click the client/entity name you want to edit. This opens the Client/Entity Details page.
Client /Entity Details
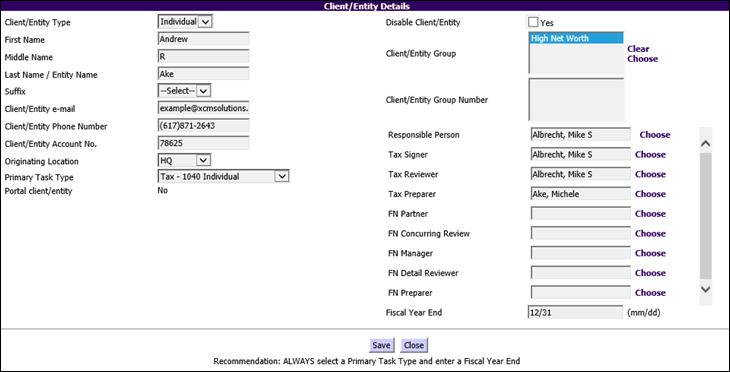
2. Make the necessary changes.
3. Click Save to save the changes.
Edit Multiple Clients/Entities
The bulk edit feature enables you to modify only the following: Primary Task Type, Client/Entity Type, Originating Location, Group, Active/Inactive and Fiscal Year End.
To perform a bulk edit on the Choose/Search Client/Entity page after you have done a search for the clients:
1. Select one or more clients/entities for bulk editing using one of the following methods:
•Select the check box beside the relevant client/entity names to select one or more clients.
•Select the check box beside Client/Entity Name to select all clients/entities displayed in the current page.
•Select the check box beside Select all seen at the top-left of the search results to select all clients/entities from all pages.
2. Make the appropriate changes to Primary Task Type, Client/Entity Type, Originating Location, Group, Active/Inactive and Fiscal Year End.
3. Click Apply Changes to save the changes done.
Disable a Client/Entity
A Client/Entity can be marked inactive from the Client/Entity Details page or Choose/Search Clientpage.
To disable a client/entity from the Client/Entity Details page:
1. Click the relevant Client/Entity name from the search results in the Choose/Search Client/Entity page to open the Client/Entity Details page.
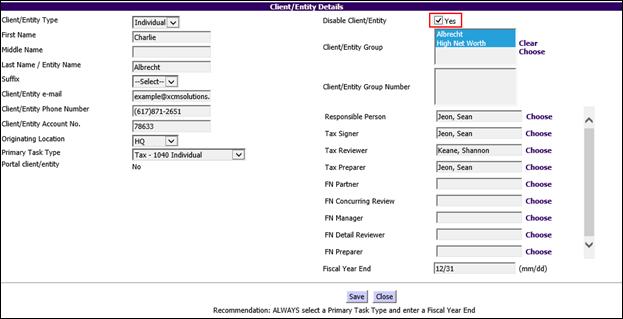
2. Select the Disable Client/Entity check box.
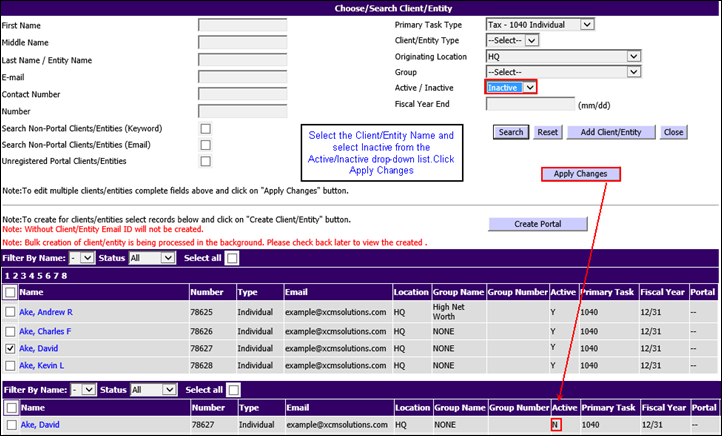
3. Click Save to save the changes. The client status changes to Inactive and appears with the notation N in the Active column of the search results.
You can also disable a client/entity from the Choose/Search Client/Entity page. To do this, select the client /entity name and then select Inactive from the Active/Inactive drop-down list. Click Apply Changes.
Choose/Search Client/Entity
