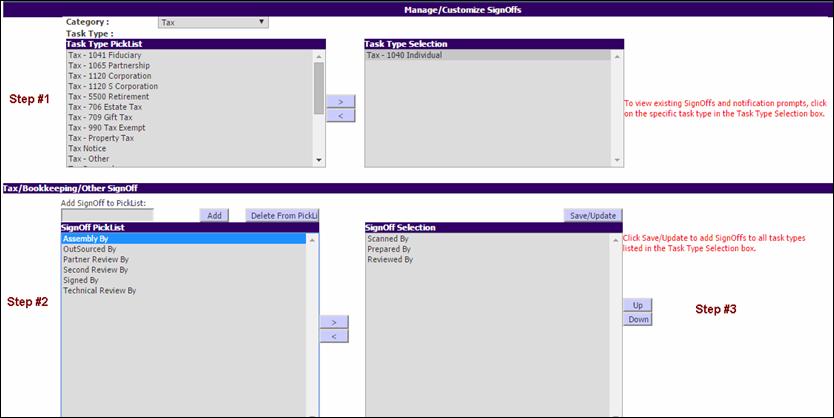
The Manage SignOff utility has been created to allow you to customize the SignOff page at a Task Type level. This utility allows for greater flexibility to create specific SignOff pages that you may require as part of your control process.
From the Utilities menu, select Setup Utilities > Manage/Customize Signoffs.
The Manage SignOff utility is separated into three distinct sections:
1. Section #1 is where you select the Task Types for which you would like to customize the SignOff page.
2. Section #2 is where you are able to add new SignOffs to the Pick List and then choose which SignOffs you would like displayed on the SignOff page.
3. Section #3 is where you are able to add the Notification Prompts and the designated roles accountable for SignOff.


1. From the Category drop-down list, select the category of the Task Types for which you want to customize the SignOff page.
2. Click on the Task Type for which you want to customize the SignOff page. With the arrows, move the Task Type to the Task Type Selection box.
You can customize the SignOff page for multiple Task Types at the same time. Use the Ctrl and Shift keys to pick multiple Task Types and move them over in bulk.
In the Task Type Selection box, click on a Task Type to view the existing SignOffs and notification prompts for that Task Type.
Step 2
You can do the following:
•To create a custom SignOff, add the new SignOff description in the Add Signoff to PickList text box, and then click Add. This will add your custom SignOff to the PickList.
•To delete a SignOff from the PickList, click on the Signoff Name so it is highlighted and click Delete from PickList.
|
|
This will delete the SignOff from the PickList but will not delete the SignOff from any existing SignOff pages |
Step 3
1. To reorder the SignOffs as they are to appear on the SignOff page, use the Up and Down buttons.
2. After you have finished arranging the SignOffs, click Save/Update to have the SignOffs apply to the Task Types in the Task Type Section box above.
|
|
All Task Types listed in the Task Type Selection box, not just those that are highlighted, will be updated with the new SignOffs. |
Step 4
After you click Save/Update, the grid will reflect the new SignOffs.
1. Click on the box to the left of SignOff and add/change the notification prompt using options in the Type of Prompt and Status Prompt drop-down menus.
The Warning prompt indicates that a SignOff has not been completed. However, you can continue to move the Task.
The Required prompt indicates that a SignOff has not been completed and will not allow you to move the Task until the SignOff has been completed. We suggest, in most cases, that the Required prompt only be used in limited scenarios such as when the Task is moved to Completed Status.
2. In addition to the Warning/Required notification, you need to indicate when the prompt should be displayed. To do that, use the Status Prompt drop-down to select the associated status.
The SignOff Prepared By in the Manage/Customize SignOffs page is associated with the Status Preparation. If a user tries to move the Task out of the Status Preparation, without completing the Prepared By SignOff, a prompt is displayed to remind the user that the SignOff needs to be completed.
Changes made to the SignOff page will update Tasks in the Status No Info In and future Tasks. To override the SignOffs currently in place for the Tasks in the workflow, click Apply to all Active Tasks.
|
|
While you can add the SignOffs to multiple Task Types at a time, warning notifications, Status prompts, and associated Statuses are modified individually. |