Two User Groups cannot have the same User rights. Changes applied to user groups will automatically apply to users within that group. You do not have to add or remove a user to the user group for the changes to apply.
This utility enables you to build user group profiles and assign user rights on XCM. To build user group profiles and assign user rights you need the user right—Manage Bulk User Groups and User Rights.
Each group contains a set of user rights. User rights are managed from the Manage Users utility.
|
|
Two User Groups cannot have the same User rights. Changes applied to user groups will automatically apply to users within that group. You do not have to add or remove a user to the user group for the changes to apply. |
After a user group has been created, you can add users to the group in bulk using the Bulk Add Users to the User Groups feature of the utility.
The Firm User Rights Management feature allows you to assign rights to user groups as well as to individual users.
From the Utilities menu, select User Utilities > Bulk Manage User Groups and User Rights.
Bulk Manage User Groups and User Rights

To add a User Group:
1. In the Bulk Manage User Groups and User Rights page, select +Add new record.

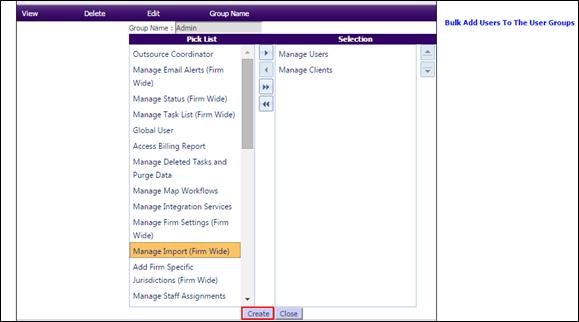
2. In the Group Name text box, type the group name.
3.
In the Pick List column, select the user right and click  to
include it in the group. To select all the available user rights, click
 . The selected user right moves to the
Selection column.
|
|
You can only view the rights that have not been assigned to a group. |
4. To add the User Group, click Create. A message stating that the new user group is added is displayed.
New User Group Added

The actions you can perform on the group created are described in the following table.
|
Click |
Description |
|
|
To view the rights assigned to a group (Admin). |
|
|
To delete a group. |
|
|
To change the rights assigned to a group. |
This utility allows you to add multiple users to group profiles as well as to bulk associate Expertise, Industry, Department, Title/Level, and Niche/Group information to users.
To access this feature, click Bulk Add Users to The User Groups found on the right side of the Add New User Group page. This opens the Bulk Add Users to The User Groups page.
Bulk Add Users to The User Groups

Step 1
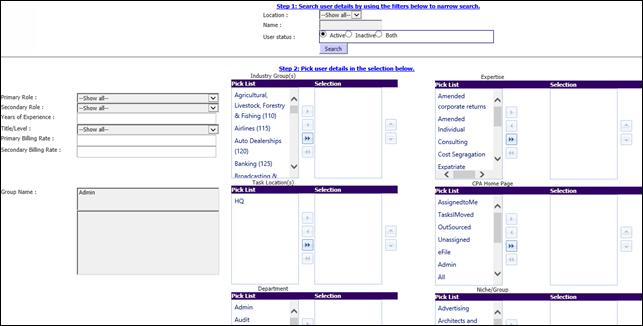
1. Search for the required users with the Location, Name of the user, and the User Status. The search results are displayed below.
Search for User Details

Step 2
2. Associate the Primary Role, Secondary Role, Title/Level, Primary Billing Rate, Secondary Billing Rate, Group Name, Industry Group(s), Expertise, Task Location(s), CPA Home Page, Department and Niche/Group details to be applied to multiple users displayed in the search results.

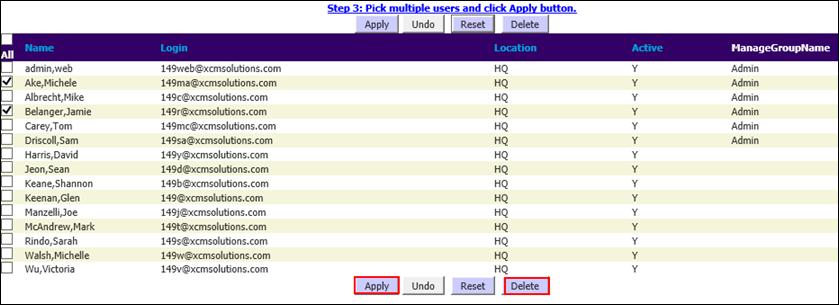
3. To apply the user details selected in Step 2 to multiple users (Select Multiple Users), select the check boxes beside the relevant user names and click Apply.