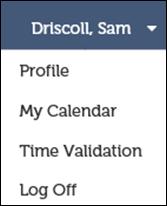
The user profile displays information about the current user. To access the user profile, click Profile under User Name.

User Profile information that can be updated includes the Industry Group, Department, and areas of expertise. This information helps to align staff expertise to assignments during scheduling.
My Calendar
My Calendar is only available if XCM Scheduler is enabled for the firm.
My Calendar displays the logged in user’s calendar of scheduled jobs and includes the Client/Entity Name, the Job Code and the number of hours scheduled on a day-to-day basis.
Time Validation
The Time Validation feature is only applicable to firms with Practice Management (PM) integration.
The Time Validation page has been enhanced to make clearing exceptions more user-friendly with fewer clicks. Time Validation provides an exception list of users whose time was entered into Practice Management but did not get mapped to XCM. Time Validation indicates that the user needs to investigate the error and update the time entry so that the correct time is reflected in the Control Sheet.
XCM provides the following two options for managing time exceptions:
•Time Validation option available in the My View page under the user name drop-down.
•Manage User Time Exception utility available under the Utilities.
Time Validation
You can manage the time exceptions using the Time Validation option located under the User Name on the My View page.
To access Time Validation, you must be granted Enable Time Validation user rights.
Time Validation-Exceptions

In the Exceptions page, you can select a Task that is available for the client and post the time, delete the time, or place the time on hold.
Time validation displays four different pages of time detail. They are:
•Exceptions
•History
•Deleted
•On hold
Exceptions: Released time that has not been posted to a Task due to discrepancies in the time and billing system and existing XCM Tasks is termed an exception.
Exceptions page

Task Search is the editable fiscal year field that will display available options for Task selection. Click on the Task Search field and select the year to search for the Task to which you want to assign time.
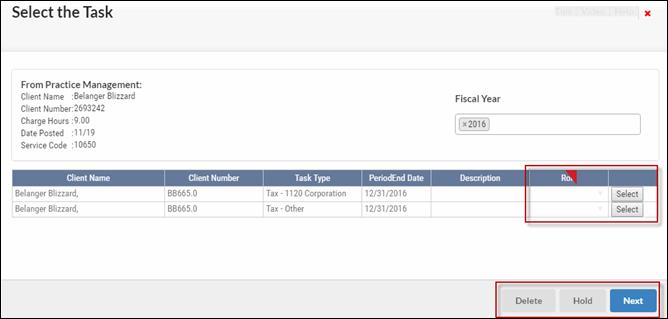
Select the Task

You can modify the role (optional) and select the appropriate Task to post time.
You can now do any of the following:
•Click Select to move to the next exception that you want to clear.
•Click Delete to delete the time. It will not be posted to a task.
•Click Hold to place this Task on a hold list to be reviewed later.
•Click Next to skip the exception and move forward.
After selections have been made and the pop-up has been closed you can view or make the changes before you submit them. Changes are marked in orange.
Exceptions

Click Submit to store the changes made on the page.
History: Released time that has been posted to an XCM task will appear on the History list for 30 days. This includes time that has been cleared from the exception report.
Time can be modified on the History page even though the time has been posted to a role or a Task.
If the Task or role is changed on the History page, XCM will delete the current post and assign the time where instructed. After selections have been made and the pop-up has been closed you can view or make the changes before you submit them. Changes are marked in orange.
Click Submit to store the changes made on the page.
History

Deleted: Provides a list of exceptions deleted within the past 30 days. This is an editable page. Time can be posted to a Task within the 30-day window if a Task is chosen and applied from this page.
Exceptions-Deleted

On Hold: Provides a list of exceptions placed on hold. This is an editable page. Time can be posted to a Task and applied from this page.
Exceptions-On Hold

Manage User Time Exception
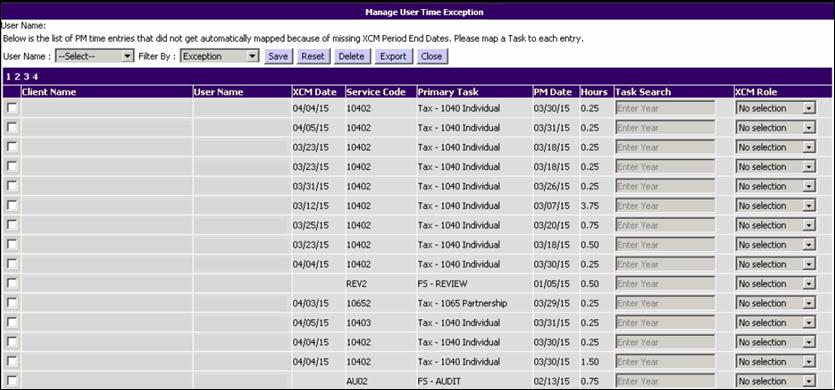
Management can view all user Exceptions in the Manage User Time Exception utility. This utility displays the entire firm Exception list.
From the Utilities menu, select One Time Mapping > Manage User Time Exception. This opens the Manage Users Time Exception page.
Manage User Time Exception

You can use the User Name or Filter By drop-down list to narrow down the Exception list. Click on the Task Search field and enter the year to search for the Task to which you want to apply changes. You can also modify the XCM Role. Click Save to apply the time to the Task and Role selected.
You can export the entire Exception list to Excel using Export button. To delete any exceptions, select the relevant Exception and click Delete.