
The Manage Checklist Utility allows a firm or company to standardize the work that needs to be done in order to complete a Task. XCM allows this standardization to be created at the Task Type level, so that you can create a standard set of Checklist items for a Form 1120 tax return as opposed to an audited financial statement.
Because this information is captured within XCM, it allows partners, managers, and firm administrators a quick and detailed view of how work on their clients is progressing. A Checklist serves as a guide to staff members showing what needs to be done for a particular Task.
From the Utilities menu, select Setup Utilities > Manage/Customize Checklists. This opens the Manage/Customize Checklists page.
Manage Checklist Utility Tasks
The Manage Checklist Utility works like the Manage SignOff Utility. The Utility is separated into three distinct sections:
1. Section #1 where you can select the Task Types for which you would like to customize the Checklist page.
2. Section #2 where you can add new Checklist items to the Pick List and then choose the Checklist items you would like displayed on the Checklist page.
3. Section #3 where you can add the Associated Status and assign the Responsible Person role (which is populated from the staffing reflected on the Routing page) to the Checklist page.
Manage/Customize Checklists

Step 1
1. From the Category drop-down list, select the category of the Task Type that you want to standardize on the Checklist page.
2. In the Task Type PickList, click on the Task Type for which you want to customize the Checklist page and use the arrow buttons to move the Task Type to the Task Type Selection box.
You can customize the Checklist page for multiple Task Types at one time. Press the Ctrl and Shift keys together to select multiple Task Types.
3. Click on a Task Type within the Task Type Selection box to view the existing Checklist items for that particular Task Type. You can only click on one Task Type at a time to view the existing Checklist items.
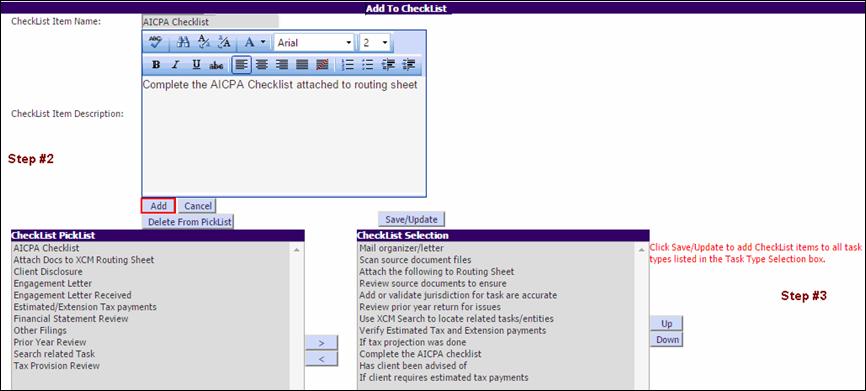
Step 2
To add a new Checklist item to the PickList:
1. In the Checklist Item Name text box, type the name of the Checklist item.
2. In the Checklist Description text box, type the description of the Checklist item.
3. Click Add to add the new Checklist item to the PickList.
To delete a Checklist item from the PickList:
1. Highlight the Checklist name within the Checklist PickList.
2. Click Delete from Pick List. This will delete the Checklist items from the PickList but will not delete the Checklist items from any existing Checklist page.
Step 3
1. Select the Checklist items that need to be present on the Checklist.
Use the Up and Down buttons to reorder the Checklist items to match how they are to appear on the Checklist page.
2. Click Save/Update to have the Checklist items apply to the Task Types in the Task Type Selection box above.
|
|
All Task Types listed in the Task Type Selection box, not just those that are highlighted, will be updated with the new SignOffs. |
Step 4
1. After you click Save/Update, the grid will reflect the new Checklist items.
2. Select the check boxes beside the Checklist items for which you want to associate a Status and assign a Responsible Role.
3. Select the relevant options from the Associated Status and Responsible Role drop-down lists. The associated status is displayed on the Checklist page and the application will look to the Control Sheet (routing page) for the recorded role to populate the Assigned Person field on the Checklist page.
|
|
While you can add the Checklist to multiple Task Types at a time, the associated Status and responsible roles are modified individually. |
Apply Checklist Items to Active Tasks
In addition to the existing checklists that have been applied to a particular task type, you can assign and apply new checklist items to tasks that are in progress. To do this:
1. In the Manage/ Customize Checklists page, select the task type for which you want to add a checklist from Task Type PickList.
2. To move your selection to Task Type Selection, use the forward arrow.
Manage/Customize Checklists – select Task Type

3. Click the task type from Task Type Selection to view existing checklists for the task type in the CheckList Selection.
Manage/Customize Checklists – Checklists
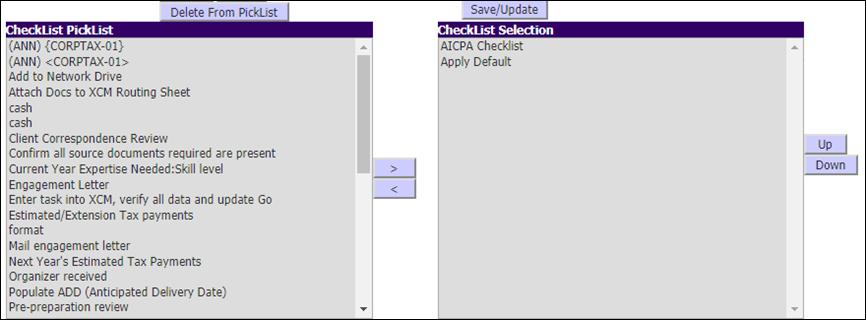
The checklists under Checklist Selection are reflected in the Checklist section of the Control Sheet as shown in the following figure.
Control Sheet - Checklists

4. From CheckList PickList, select the checklist item(s) that you want to add for the task type and use the forward arrow to move your selection to CheckList Selection.
Manage/Customize Checklists – Add Checklist
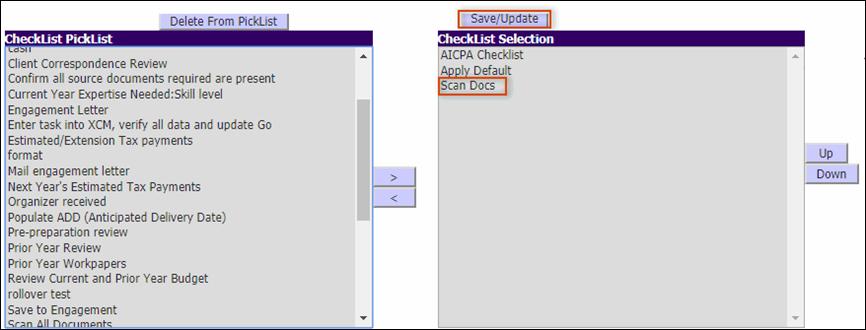
5. Click Save/Update to add the checklist item to the task type.
6. Now click Apply To All Active Tasks to assign the newly added checklist item to all on-going tasks.
Manage/Customize Checklists – Apply To All Active Tasks

In the Control Sheet, the checklist item is now applied to all tasks pertaining to the specific task type as reflected in the figure that follows.
Control Sheet – New Checklist applied to Existing Tasks

Remove Checklist Items from all Active Tasks
When you remove a checklist item from a task type, the checklist item can be removed from all on-going tasks pertaining to the task type. To remove a checklist item from all active tasks:
1. Select the checklist item from CheckList Selection and use the back arrow to move the checklist item to CheckList PickList.
Manage/Customize Checklists – Remove Checklist Item
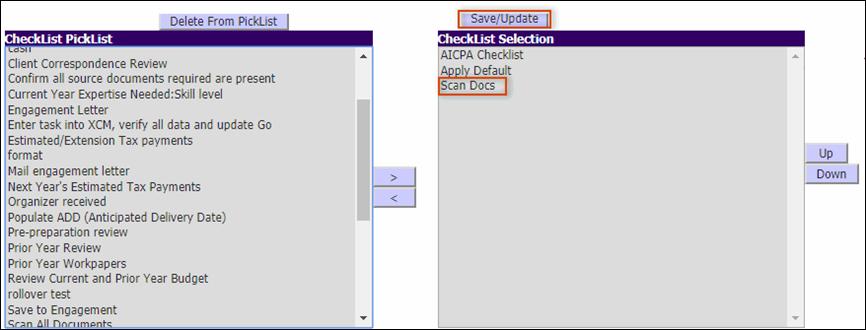
2. Click Save/Update.
3. Click Apply To All Active Tasks to remove the selected checklist item from all tasks in progress.
Manage/Customize Checklists – Remove Checklist from all Active Tasks

This is reflected in the Checklist section of the Control Sheet as shown in the figure below.
Control Sheet – Remove Checklist from all Active Tasks

Restore a Checklist that was removed within a Specific Task
A checklist item deleted from the Checklist section of the Control Sheet is added back to the same task when Apply to All Active Tasks is selected in the Manage/Customize Checklist Utility.
The figure that follows shows the Checklist item Scan Docs is deleted from a task in the Control Sheet.
Control Sheet – Delete Checklist from Task

When the checklist item is selected in the Manage/Customize CheckList utility and is applied to all tasks of the relevant task type, the Checklist is reinstated in the Control Sheet.
Control Sheet – Checklist included in task

Remove a Checklist that has a Done Status in a Task
When you remove a checklist item that has a task in the Done status from the Manage/Customize CheckList utility:
•The Checklist item is removed from the Task Type, however,
•The Checklist item is retained in the Control Sheet.
Control Sheet – Checklist Done Status
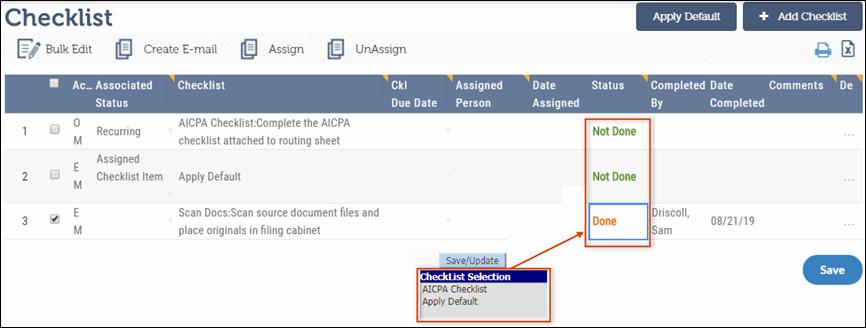
For example, the checklist Scan Docs has been removed from the task type but is displayed in the control sheet as it has a Done status.