This feature of the Utilities menu is used to delete selected Tasks or purge information within the selected Tasks.
The Purge Data feature deletes the data related to a Task and not the Task itself. However, the Delete Task utility permanently deletes the selected Tasks. These operations stage the deleted Tasks in a temporary holding area that XCM application administrators permanently purge each month. See Restore Deleted Tasks utility.
From the Utilities menu, go to Delete/Purge Utilities > Delete Task and Purge Data.
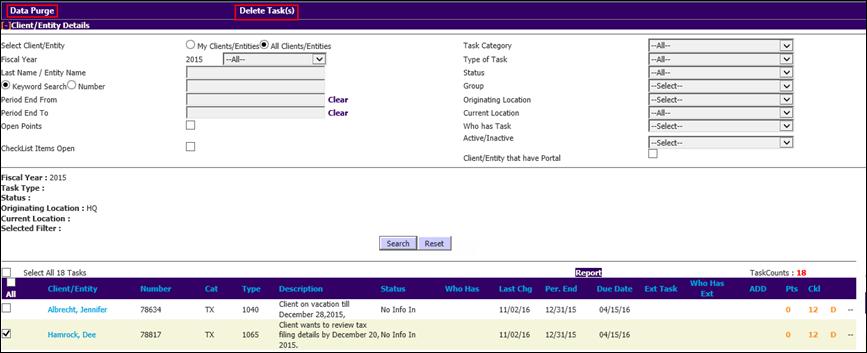
To delete Tasks or purge Task data, you first need to search for the relevant Tasks in the Data Purge/Delete (Tasks) page. The search results are displayed below the Client/Entity Details section.
You can:
•Delete only Tasks that are in No Info In, Recurring, No Longer Task/To Be Deleted and NLC Status.
•Purge Tasks that have Completed Status.
To delete Tasks or purge Task data:
1. In the Data Purge/Delete (Tasks) page, search on required criteria to view the Tasks to be deleted or purged.
2. In the search results table that is displayed below the Client/Entity Details section where you have searched, click the check box beside the Task name to select the Tasks that you want to delete or purge.
3. Scroll to the top of the Data Purge/Delete (Tasks) page and click Data Purge or Delete Task(s) as required.

To permanently remove Task-related data, do the following:
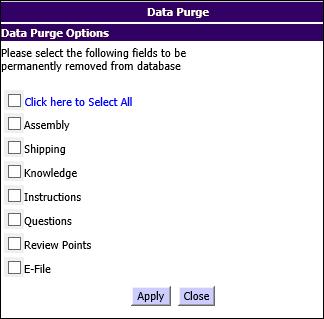
1. In the Data Purge/Delete (Tasks) page, click Data Purge. This opens a dialog box where you can select items from the Task to be permanently deleted.
Data Purge Options

2. Select the check box beside the data you want to purge and click Apply.
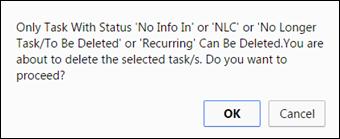
When you click Delete Task(s) in the Data Purge/Delete (Tasks) page, you will see a message that asks you to confirm that you want to delete the Task as well as all associated data.
Delete Task-Message

Click OK to confirm that you want to delete the Tasks. The message appears twice, and you have to confirm twice that you want to delete the Task.